DLTK's Crafts for Kids
Mason Jar Piggy Bank Craft
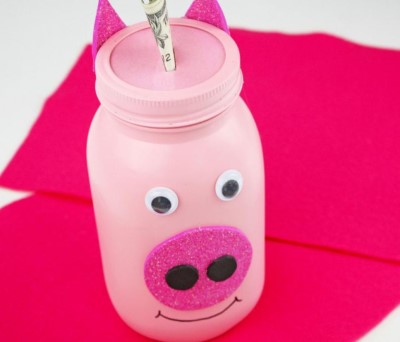
Today, I've got a fantastic project to share with you – we're going to make a stylish mason jar piggy bank. This DIY project is perfect for teaching kids about the importance of saving money. So, let's gather our supplies and start crafting our very own mason jar piggy banks together!
Materials:
- Mason jar (with a screw-on ring lid)
- Cardboard (like from a cereal box)
- Pencil
- Craft knife or scissors
- Colored paper, fabric, or paint (for decoration)
- Glue or Mod Podge (if using paper or fabric)
- Paintbrush (if using Mod Podge or paint)
- Black marker (for details)
- Colored paper, felt or cereal box cardboard (for ears and snout)
- Glue (to attach the features)
- Optional: wiggly eyes
Instructions:
- Clean the mason jar: Make sure your mason jar is clean and dry before starting the project. Remove any labels or residue from the surface.
- Create a custom lid with a coin slot: Remove the sealer lid from the mason jar, and trace its shape onto a piece of cereal box cardboard using a pencil. Cut out the cardboard circle, and use a craft knife or scissors to carefully cut a coin slot into it. Make sure it's large enough for coins but not too big that they'll fall out. Ask an adult for help if needed.
- Decorate your mason jar: Choose your preferred method of decoration – colored paper, fabric, or paint.
a. If using colored paper or fabric, cut it to fit the size of your mason jar and attach it using glue or Mod Podge. For a smooth finish, apply a layer of Mod Podge on top of the paper or fabric and let it dry completely.
b. If using paint, paint the entire jar with your desired color or pattern. Let it dry completely before moving on to the next step.
- Add the features: Cut out ears, snout, and legs from the colored paper or cardboard. Attach them to your mason jar piggy bank using glue or tape. Use a black marker to draw the eyes, nostrils, and mouth on the snout.
- Optional - Attach the tail: Create a curly tail using a small strip of paper or a pipe cleaner. Glue or tape one end of the tail to the back of your mason jar piggy bank.
- Assemble the lid: Place the custom cardboard lid with the coin slot onto the jar, and secure it with the screw-on ring lid.
Now you have your very own homemade piggy bank! Start saving your coins by dropping them through the slot, and watch your savings grow. When it's time to empty your piggy bank, simply unscrew the lid and pour out the coins.
Print friendly version of these instructions