 DLTK's Crafts for Kids
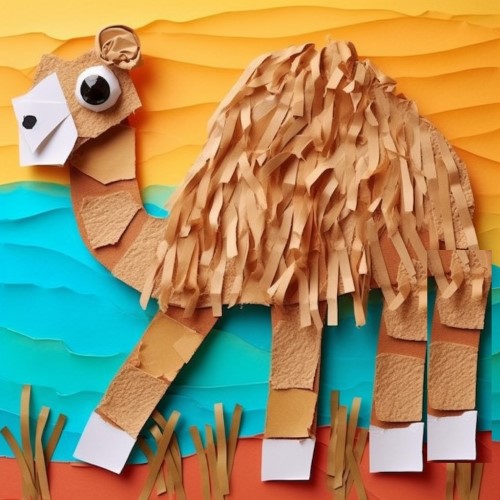
Camel Collage Craft
Welcome to our Torn Paper Camel Collage Craft!
Whether you sketch the camel freehand or use a coloring page as a guide, this craft will allow you to express your creativity and create a unique, textured piece of art.
Materials:
- Brown paper bag or brown construction paper
- Brown paper from magazines or scrapbook paper
- Pencil (optional)
- Scissors
- Glue
- Coloring page or reference image of a camel (optional)
Instructions:
- Optional: Start by tearing up large pieces of colors other than brown like blues and sunrise colors (golds and oranges). Create a background landscape using these colors before you start creating your camel.
 Start by tearing up the brown paper bag and brown paper from magazines or scrapbook paper into small pieces. These torn pieces will be used to create the collage effect for your camel craft.
- Decide on the shape of your camel. You can either lightly sketch a camel freehand using a pencil or use a coloring page or reference image as a guide. A simple camel shape can be made with a mountain shape as the hump, four rectangular legs, a curved neck, and an oval head. Adjust the size of your camel shape to fit your desired collage size.
- Once you have your camel shape ready, apply glue to one section at a time. Begin by applying glue to a small area of the camel's body or any specific part you want to cover with torn paper.
- Take small torn pieces of brown paper and place them onto the glued area, pressing them down gently to secure them. Continue this process, working section by section, until the entire camel shape is covered with torn brown paper pieces. Feel free to overlap the torn pieces to add texture and depth to your collage.
- Pay attention to the different parts of the camel, such as the hump, legs, neck, and head, and use smaller torn pieces to fit these areas more precisely.
- Continue gluing and placing torn pieces until the entire camel shape is filled with the collage. Be creative with the placement of the torn pieces to give your camel craft a unique and interesting look.
- Allow the glue to dry completely. Trim any excess torn pieces that may be extending beyond the edges of the camel shape.
- Once dry, your camel collage craft is complete! Display it proudly or use it as a decorative element in other art projects or crafts.
This camel collage craft allows you to explore the art of torn paper collage while creating a beautiful camel artwork. It's a great activity to engage your creativity and experiment with different textures and patterns using torn brown paper. Enjoy the process and have fun bringing your unique camel collage to life!
Templates:
Print friendly version of these instructions