DLTK's Crafts for Kids
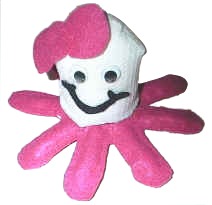
Octopus Sock Craft
 Contributed by
Leanne Guenther
Contributed by
Leanne Guenther
The project requires either sewing or hot glue skills. A child of age 9 or so could do the project with adult supervision. Younger children can help stuff the project and would love to receive it as a gift from an older sibling, parent or grandparent.
You could put in rice instead of stuffing to make this more of a beanbag.
This is a terrific first sewing project for children. If using it as such, I recommend having the children sew the body pieces together using a running stitch or a blanket stitch and then glue the remaining pieces together. I would fill with pillow stuffing instead of rice ... stuffing won't leak out as easily if the child didn't keep their stitches tight enough.
Pam, from the Cornerstone Academy, adds: The socktopus can also be used as a door stop if a few clean rocks are intermingled with stuffing.
Materials:
- one old sock (adult size)
- two pieces felt (legs) - we used pink
- one scrap black felt (mouth).
- small piece fun foam or thick cardboard
- two wiggly eyes
- hot glue OR sewing machine OR needle and thread
- Pillow stuffing, cotton balls or toilet paper (or uncooked rice if you prefer a bean bag).
- scissors,
- scotch tape
- printer and paper
Instructions:
- Print out the template (see bottom of this page).
- Cut out the template pieces.
- Scotch tape the body template to one of the pieces of felt.
- Cut the shape from the felt
- I scotch tape templates onto felt instead of pinning them as I find it easier... It doesn't "buckle" as much. It's very easy to just pull any tape off the felt after cutting
- Make sure you scotch tape liberally!
- Repeat with the second piece of felt.
- Scotch tape the mouth to the black felt and cut out.
- Scotch tape the bow pieces to a scrap of the main body felt and cut out.
- Scotch tape the circle to the fun foam or cardboard and cut out.
 Cut the toe area off the sock to act as your socktopus's head... 4
to 5 inches of the sock.
Cut the toe area off the sock to act as your socktopus's head... 4
to 5 inches of the sock.- Stuff the sock
- Insert the circle into the open end of the sock and hot glue the edges of the sock to it. This makes a flat area to attach the sock to the legs.
- Put the two legs pieces together and hot glue
them, leaving a space at the top to add stuffing.
- I actually glued the legs one at a time, let them sit for 2 minutes and then stuffed the leg before gluing the next leg.
- I used an unsharpened pencil to poke the stuffing into the leg
- If you're hot gluing, do a 2 to 4 inch section at a time (so the
glue doesn't harden on you).
- The less experienced you are with hot glue, the shorter the section should be.
- I usually have my daughter use a popsicle stick to press pieces together without getting any of the heated glue on her skin... I just use my fingers.
- My 9 year old daughter has been able to use my "low temp
craft glue gun" with supervision for a couple of years.
- Fill with rice or small beans (a funnel or a home made funnel made of paper will help with the pouring). Sew or glue the hole shut.
- Glue the sock body onto the legs.
- Glue the mouth onto the head.
- Glue on the wiggly eyes.
- Optional: Glue the bow on her head
Templates:
- Close the template window after printing to return to this screen.
- Set page margins to zero if you have trouble fitting the template on one page (FILE, PAGE SETUP or FILE, PRINTER SETUP in most browsers).
- You need to print both templates
Template
Print friendly version of these instructions

