DLTK's Crafts for Kids
How to “Build” a Tree

Many years ago when I was in elementary school, our art teacher taught us how to “build” a tree with paint. To this day, I still enjoy mixing a couple of tree bark colors and using them to build trees.
I loved that lesson! And thought I’d share it here with you. It’s appropriate for anyone who can hold a paintbrush.

You will need: paper, thin paintbrush, something to mix paint on (a paper plate for example) and paint in two or three tree–bark colors. The larger the piece of paper you have to work with, the larger your paintbrush can be.
Acrylic paint is my favorite to use. It keeps for a long time—if it starts to get a little thick, just add some water and shake it up. It comes in lots of colors and it dries fairly quickly. While it is still wet, it washes out. Once it is dry, it won’t come out anymore. This is a mixed curse/blessing—just remember that if you slop it somewhere you don’t want it you need to clean it up RIGHT AWAY.
Children’s paints (fingerpaints or tempra paints) also work very well, especially when working with young children. Remember that you can give them a bit of white paint too if you feel you don’t have enough shades and they can practice making their own greys or lighter shades of brown.
I’ve provided a printable template that you can use as a guide but you don’t really need one (especially when you’ve done this a few times)—free hand tree trunks are very easy to do.

First we’re going to make a little paint pallet. You can use a paper plate, piece of waxed paper or old margarine container lid. Squeeze two or three tree bark colors onto your pallet. Greys, browns and black are all great but you can go crazy making “fantasy trees” or “alien trees” in any color you like!
It’s a little hard to see in the photo, but I have black and two shades of brown that I’m working with—one brown is a little more yellow–y and the other is a bit more red. If you only have one type of brown, feel free to put a bit of red and/or yellow on your pallet to make your own shades. Honestly, playing around with the colors is my favorite part of painting!

Dip your brush into the different colors and start a little puddle of your own mixed up color. You can swirl it around a little, but don’t mix it completely. We want the colors in the tree trunk to streak together to look like bark.
Load your brush with lots of paint.

Start at “ground level” (where your tree is growing out of the ground) and draw one branch all the way from the ground to the tip of the branch. Don’t worry about making your trunk wide yet! Just draw that single branch from the ground to the tip.
In a perfect world, you can do this without having to stop and reload your brush, but I never can. I usually have to reload my brush two or three times per branch (likely because I like TALL trees).

Repeat for a second branch.
Now dip your brush in some paint again, loading it up nice and full and do the exact same thing a second time. Space your branches a bit apart to form the “outside” of your trunk.
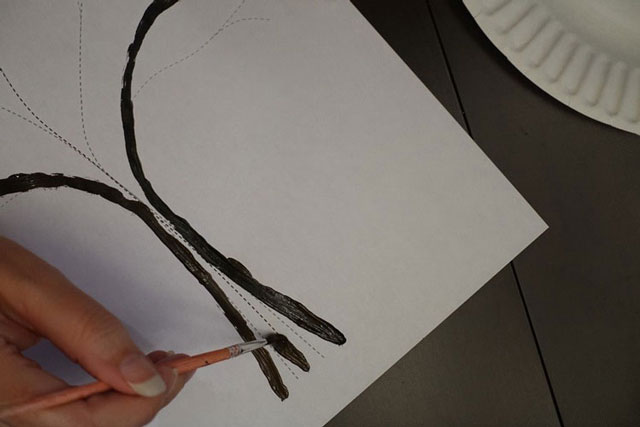
Repeat the process a third time, this time in the center of your tree trunk.

And a fourth and fifth time.
At this point, the trunk of your tree should be pretty much filled in and instead of starting at the very base of your tree, you can start where the branches fork. Once the trunk is filled, you don’t want to keep going over it because you don’t want the colors to mix—if (for some reason) you do decide to keep going over the trunk, take a break to let your paint dry before you continue. You should have a trunk that looks something like this close–up:

Anyways, as I said, you can stop going over the trunk and just start picking up where the branches fork. Two or three twiggy branches per main one is plenty!

Above is the tree I made using the printable template.
And below is the one I made freehand!

Once you’ve built your tree, you should set it aside to dry completely.
Once it’s dry, you can use it as the base for many craft projects—add real leaves you collect outside, scrunched up tissue paper squares or q–tip blobs.
Here’s an example of using a q–tip with pink, purple and white (just randomly dip it in colors) to create cute little spring–time flowers. You could use the same approach with orange, red and yellow to make an autumn leaves tree.

And here’s an example of where we scrunched squares of tissue paper around a pencil eraser to make a spring tree (again, use green for a summer tree or orange for an autumn one).

And don’t forget the most important instruction: HAVE FUN!
Arbor Day Crafts and Activities: https://www.dltk-kids.com/crafts/arborday/
 About Leanne:
Wife, mom and the woman behind the scenes of the DLTK's Crafts for Kids websites. The websites are a terrific hobby -- run by (me) Leanne, a mom with two girls as my official craft testers and my husband as my technical support. DLTK are the first initials of each of the people in my family (I'm the L!). Whenever we send out little cards or whatnot, we sign 'love DLTK' ... when I started the website I used the initials. Had I known the website would get actual strangers visiting it, I would have picked a less mysterious name but we're all stuck with it now!
You can view my other blog posts here.