DLTK's Holiday Crafts for Kids
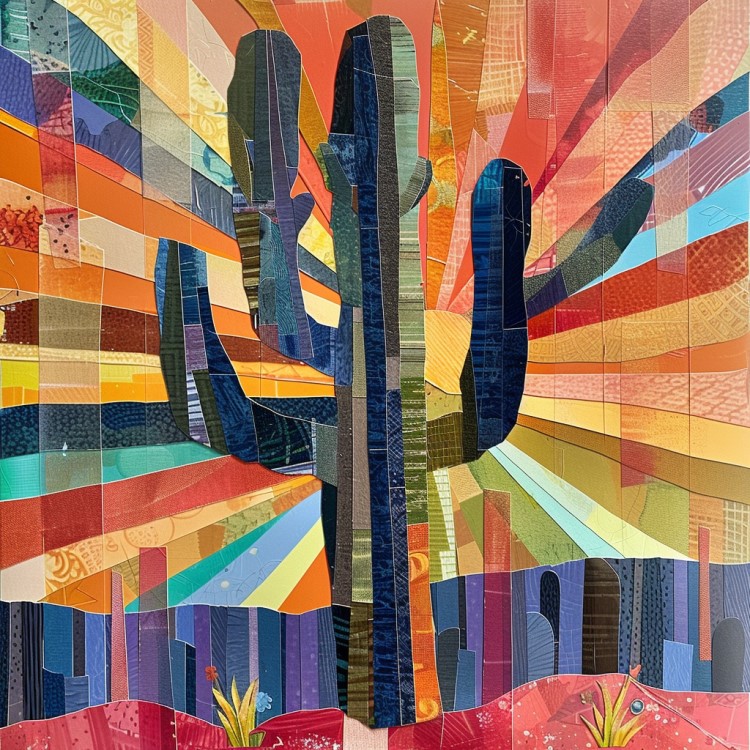
Cactus Collage Craft
 Contributed by
Leanne Guenther
Contributed by
Leanne Guenther
Collage art is a creative adventure that's perfect for crafters of all ages, from eager preschoolers to artistic grandmas. Our Cactus Collage project combines the simplicity of paper and glue with the boundless possibilities of color and texture, inviting everyone to create their very own desert masterpiece.
Materials:
- Construction Paper: Gather various shades of green for the cactus, and any other colors you love for the background.
- Scissors: For cutting out cactus shapes and trimming your collage pieces.
- Glue: Any standard craft glue will do for assembling your collage.
- Markers: To add details to your cactus collage.
- Floral Embellishments: Real or paper flowers to adorn your cactus and give it some desert bloom.
- Recycled Paper: Old magazines, flyers, tissue paper, scrapbook paper, or any pretty paper scraps you have on hand.
Craft Instructions:
- Prepare Your Base:
- Start with a white piece of paper to serve as the foundation of your collage. The white piece of paper you're using for the base at this point doesn't have to be pristine. You can reuse something from the recycle bin.
- Create Your Color Palette:
- Begin tearing or cutting your recycled paper into small pieces. Focus on greens for your cactus, but feel free to include other colors that spark joy.
- Arrange and glue these pieces onto your base paper, covering it in a vibrant patchwork. This is where your creativity shines, so mix and match to your heart's content!
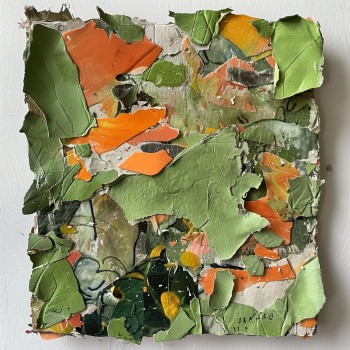 We aren't trying to make a cactus yet. We're just trying to completely cover one or two pieces of paper in a patchwork of torn scraps of paper in colors we like. I use all kinds of sources for my scrap colored paper including magazines, construction paper, flyers, tissue paper, scrapbook paper, reused floral paper (my flower store uses very pretty paper!) and old kleenex boxes (they often have pretty patterns on them). I love to make collages and have a bin where I toss any bits of pretty paper or thin cardboard for future projects.
- Embrace the Texture:
- If your paper is crumpled or textured, even better! These little imperfections add depth and interest to your collage.
- Let It Dry:
- Once your base is fully covered, set it aside to dry. This is crucial for ensuring your collage stays together when you cut into it.
- Shape Your Cactus:
- From your colorful patchwork, cut out shapes for your cactus stems and arms. Experiment with sizes and angles to mimic the variety found in real cacti.
- Assemble Your Cactus:
- On a fresh piece of background paper, start gluing your cactus pieces. Place the largest stem piece at the bottom and layer smaller pieces or arms as you move up, creating a 3D effect.
 Rather than a simple white or black background, you can make a dynamic background that brings your desert scene to life. Here are a few ideas:
- Watercolor Sunset: Paint a soft, fading sunset using watercolors on your background paper. Blend oranges, pinks, purples, and blues to mimic the sky at dusk.
- Bright Blue Sky: Opt for a bright blue piece of paper and glue fluffy cotton ball clouds to create a cheerful daytime scene.
- Collage Background: Create a layered look using scraps of blue paper for the sky and pieces in shades of beige and brown for the desert ground. This technique adds depth and interest to your collage.
- Add Details and Decorations:
- Use markers to draw spines or patterns on your cactus. Glue on your floral embellishments to bring your cactus collage to life with pops of color.
- Display Your Artwork:
- Once complete, find the perfect spot to showcase your cactus collage. It's sure to brighten any room with its burst of creativity and color!

This Cactus Collage Craft is more than just an activity; it's a way to recycle, create, and express yourself. So gather your materials, let your imagination run wild, and watch as your very own collage cactus comes to life!