< More Blue's Clues
< More
Cakes
Blue's Clues Birthday Cakes
| CAKE #1 is very simple. It's one round cake and 4 cupcakes all frosted with blue
icing and arranged like a pawprint. It makes a good addition to CAKE #2 if you're
worried about having enough servings. See the Doggy
Pawprint Cake page for further directions. |
 |
CAKE #2: The tough one!
I hate baking and I loathe decorating cakes (even simple chocolate frosting is a
dreaded ordeal).
But, I love my kids. Luckily, my 6 year old likes Dairy Queen ice cream cakes so
I haven't had to subject myself to this too often *grin*.
Oddly enough, it only took me one try to make the cake. I'm not going to lie and
say it was a pleasant, 10 minute task. It took me about an hour to decorate and I
hated icing the sides (I don't like sugar and ended up rather covered in it by the end of
the project)
And one last thing before we get started... Before any of you email me asking for a
similar idea with another theme...
I'll tell you in advance the answer is "no!" *laugh*. I only put myself
through this type of perverse torture for my children.
Magenta: Gayle reminded me that with a different jar of food coloring
you could make a great Magenta Version of all these cakes. Take a look at
the photos of her Blue and Magenta cakes.
Materials:
- one or two cake mixes (depending on if you choose the large or small template) - it
doesn't matter what flavour... You can make your favorite scratch cake if you're so
inclined
- one or two containers of white icing (or you can make your favorite kind).
- 9x13 rectangular cake pan.
- blue food color (we used Sky Blue paste but your standard drops would work too... You'll
just have to use lots of them).
- blue cake sparkles (you can find them at your craft store) OR darker blue icing
-- just mix more blue color in and perhaps a drop of red just to darken things up a bit
- wiggly eyes (yes the craft kind... Don't laugh!)
My "just turned 3" year old Kaitlyn, on
the other hand, likes to help mommy cook. So... When it came time to choose her
birthday cake, she did the one thing I had dreaded since I first gave birth... she asked
if we could bake a cake together.
And not just any cake I might add... she wanted a Blue's Clues birthday cake *shudder*
Off we went to the store to purchase 4 cake mixes and 4 containers of
white icing (nope, no scratch cakes for this mommy). Why FOUR you ask?
Well... They were on sale and I figured:
- One for the Blue's Clues cake,
- one for a simple round cake (extra helpings) and
- 2 spares just in case I goofed at some point in the process.
(Do you get the feeling that Martha has nothing to fear in terms of
competition from me?)
I've given templates for a big cake (two cake mixes) or a smaller one (one cake
mix).
|

This has turned out to be such a popular cake template!
Check out the pictures of Blue's Clues cakes made
by our viewers -- some
made neat modifications!
By Amanda for her
daughter
By Amber for Mckendra
By Jassiline
By Denise for her son
By Todd and Robin for Jordan
By Vickie for her Granddaughter
By Gayle for Taylor
By Gwen for her daughter
By Kathleen for her grandson Ethan
By Jeff and Lori for their son
By Lin for her son's first birthday
By Jeannie for her grandson Vance
By Trica for her daughter Kayla
By Beej for her son Kevin
By Cindi for her son
By Kirsten for her son Jordan
By Shalon for her son Cannon
By Tricai for her daughter Meagan
By Malik for her daughter Jade
By Natalie for her daughter
By Ida for her son
By Karen for her son
By Cheryl for Logan
By Manuela for her cousin David
By Bambi for her son
By Clare for her nephew Declan
By Brandy for her son Joey
By Amy for her daughter Liah
By Mary for her grandson Matthew
By Deanna for her granddaughter Kendra Marie
By Nikki for her son Zack
By Marissa for her son
By Ashley for Aiden
By Shana for son Tristan
By Heather for daughter Maggie
By Lauren for her son
By Shelly for a friend's daughter
By a viewer for her daughter
Michelle
By Libby for her daughter Elizabeth
By Donna for her daughter Emma
By Adriane for her son Preston
By Andrea for her niece Opal
By Sheldon for grandson Benjamin
By Melissa for her son
By DeAnna for Kyle
By Tiffany for her three children
By Kristi for Hannah
|
We did the smaller one plus a regular round cake. I had it in the back of my head
that if things got really bad, I could just ice the round one blue and add cake
sprinkles. If you've successfully accomplished these kind of cakes before, you can
make the big cake.
- Bake your cake according to package directions
Kimberly adds the following tip: "P.S. For the Blue's clues cake, I found it
easier to remove the cake in one piece from the pan when I buttered the bottom of the pan
and sprinkled on flour before putting the batter in."
- Let cool (I did this the night before and didn't really let it cool enough... It really
should be completely cool before you start)
|
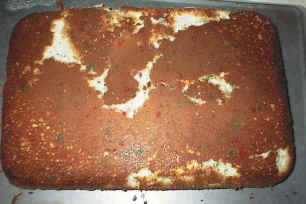
- If your cake has a bulging center, trim it a bit so it's flat on top (this shouldn't be
a huge problem in the 9x13 rectangular pans... I didn't have to trim mine.
- Turn the cake out onto a piece of Aluminum foil.
- This is easier than it sounds!
- Make sure you run a knife around the edges first so there's nothing
sticking.
- You'll notice from my lovely photo that my cake stuck and tore a bit.
- I just pieced it back together as best I could... It didn't seem to hurt anything.
|
 |
- If you have time to leave it sit for 24 hours at this point, that's your best bet (it's
less crumby if you do).
I, of course, did not have time for this -- I'm sure Martha would have.
- Tip from a viewer:
"Instead of just leaving it sit for 24 hours that if you freeze your cake it is much easier to ice and you can just brush crumbs off.
" Thanks for the advice Amber!
- Cut out the template pieces and arrange them on your cake.
- Use toothpicks to hold the template in place (poke them through the paper into the cake).
- If you're using the small cake template, the smidge of an ear template piece has to go
on upside down (ink side facing the cake).
- Cut around the template pieces with a sharp knife. Be nice and smooth about it (I
did it with the point of the knife)
|
 |
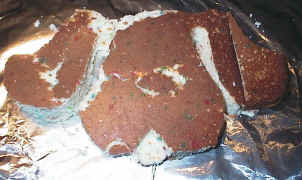
- Remove the template from the cake.
- Remove all the scraps and put them aside (try not to rip the cake when you're removing
the scraps).
- Arrange the cake on a covered board (we used our cutting board and just covered it with Aluminum foil). Make sure all the pieces are touching properly.
- Take one of the scraps (something about 4" x 4"). Cut it down the center
so it's only 1/3 to 1/2 the height of the cake. Cut out a nose shape from this scrap
and "glue" it on top of the cake with a bit of icing.
- Cut out a dip in the cake where the mouth is (cut away about 1/2 the height of the cake)
|
 |
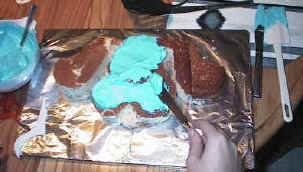
- Mix your blue color and your white icing
- use 1 whole can for a small cake and 2 cans for a large cake...
- you do NOT want to run out of icing and have to try to re-mix the blue color... Odds are
you'll end up with a different shade of blue.
- Spread it on the cake (I've read that you're supposed to do the sides first, but I
always start with the top).
- I added about 1 1/2 Tbsp of milk to the one can store bought icing to make it a bit
easier to spread. Julieanne adds that if you add 1 to 2 Tbsp of corn syrup instead
of milk that the icing will spread much better and you won't get as many crumbs!
- If you get crumbs on your knife, get a new knife (it sounds simple, but it took me
awhile to realize how helpful it would be to switch knives when they got crumby).
- Tip from a viewer:
"Dip the knife in a cup of warm water. Make sure the water's warm and shake any excess from the
knife. The frosting won't stick!!"
|
 |
- Cut all the dark blue parts (spots and nose) from the template, being careful not to cut
into the main template.
- Put it on the iced cake like a stencil and push it slightly into the icing around the
dark blue parts (so the dark blue doesn't seep underneath).
|
 |
- Sprinkle on your cake sparkles (or spread on darker blue icing).
- I ended up taking off the lid and just dumping small mounds into the center of each
stencil area. I spread these mounds with a toothpick (and also tapped them lightly
into the icing with the toothpick).
- If you get any sparkles on the paper, brush them into one of the stencil areas before
you remove the template.
|
 |
- remove the template and touch up anywhere the icing came off
- I tried valiantly to make eyes out of icing sugar and brown chocolate sprinkles but they
didn't turn out, so I scraped them off, re-iced a little bit and just stuck on craft
wiggly eyes (don't eat them!)
- The wiggly eyes worked great, and everyone who knows me got a good giggle... my husband
summed it up perfectly by saying "we're just lucky she didn't add any toilet paper
rolls!"
|
|
SMALL CAKE TEMPLATE
(one cake mix) -
this template should fill an 8 1/2 x 11 inch piece of paper. If it prints out small
for you, please check out Print Help
BIG CAKE (two cake mixes)