Iron On Transfer T-ShirtsEevee and PikachuPokemon Themes |
 |
 |
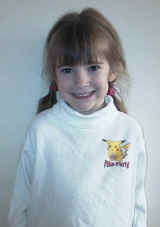
| These photos show the shirt after almost 2 years of wearing and washing, so it gives a good feel for how it stands up -- the shirts still look great, I think! | ||
You can also use these transfers when sewing your own tote bags.
One viewer wrote in: "I love your iron on templates. I've printed out many of these on special computer paper/puzzle sets and made sturdy felt puzzles as gifts for the grandchildren.
And another suggested: "Your templates make good mousepads too."
My story:
When Tasha turned 6, she wanted to go to one of those big play land areas with a zillion kids. I prefer to have the parties at home, but she REALLY wanted to do this, so I gave in.
My biggest concern was losing someone's child. Although I'd met most of them and had as many adult helpers as I did children, I was worried about spotting "our" kids in the crowds of frenzied, playing children.
So I came up with the idea of making theme shirts for the whole gang. Each party-goer was given one of the shirts we made with plain white Wallmart shirts and iron on transfers. We got 10 transfers in the package and made two shirts with each page (we still have some left over, almost 2 years later).
The shirts faded a smidge after a couple washes, but little sister Kaitlyn still wears her hand-me down Pikachu with pride. She's very fond of it. I was happy with the result (and we didn't lose any kids). A side benefit was that everyone got to dress up in matching outfits for school the next day *laugh*.
Materials:
- color printer
- a shirt
- we used 100% cotton and prewashed it
- light colored shirts work better than dark ones.
- You can also put them on canvas bags, backpacks or ball caps. Read the directions on the transfer paper you choose for details of what fabrics will work.
- Iron on transfer printer paper
- we used Hewlett Packard because we have an HP printer and I have it in my head that matching equipment gives better results -- I have no proof that this is true and they're the most expensive by $1 or $2 so you may want to try out some of the other ones.
- you can purchase this printer paper from your local office supply store or you can get it from Amazon. If nothing else, you can check at Amazon and read the reviews of the different choices.
- an iron
Instructions:
I'm not going to provide much in the way of directions here. Just make sure you follow the ones you get with the iron-on transfers very carefully. We only had trouble peeling the first shirt (we didn't wait long enough). When it happened, we just put everything back down, ironed it a bit more and you couldn't tell we'd messed up. All I can say is make sure you wait.
In terms of printing the transfers, you have to figure out if your printer prints on the top or the bottom. I just printed the word TEST on a scrap piece of paper. Before printing, I put an X on the front of the paper (face up) and that way, I knew whether it printed on the face up or face down side.
Make sure you set your margins as low as you can. Go into FILE, PRINT SETUP or FILE, PAGE SETUP on your browser and adjust your margins to .25 or so. In this same location you can also turn off your header and footer so you don't print the date and such.
The templates have 4 pieces to them (enough or 2 t-shirts). As you can see in the photo at the top of this page, we put the Pikachu head on the back of the shirt and the Pika-Party logo on the front (about where a pocket would be). You can arrange your t-shirts however you prefer.
Just to be clear, you need to cut out the individual images to arrange them as you want on the shirts from one sheet of paper. You don't want to cut them out around the lines or anything... just cut a big circle around the image.
The templates look backwards (to read any words, you have to hold them up to a mirror). This isn't a mistake. It's how it has to be for the iron-on to work.
Close template window when done printing to return to this screen.
If you have trouble with frames, type an L at the end of the template URL when it comes up and hit ENTER, the frame will disappear.
Eevee template (makes 1 shirt)
Pikachu template (makes 2 shirts)