
all
images are on
one template.
You only use a
single iron on
transfer for
this bag
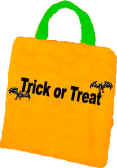
Sewing a Halloween treat bag
Very easy for adults or teenagers with a wee bit of sewing background. More challenging for moms like me who don't own a sewing machine *grin* or children aged 10+ who are just learning to sew -- It can be done by hand!
People who are experience at sewing may giggle a bit at the obvious "novice" nature of these directions. People who don't sew much should be able to follow along nicely.
Note from one mom: Cheryl had her young daughters make the whole thing pretty much by themselves by using fusible iron on tape instead of sewing -- this can be purchased at any fabric store (just ask the clerks -- they're typically very nice!). The kids pinned everything and Cheryl just had to iron a bit for the younger ones.
Note from another mom: I didn't want to buy a whole package of transfers for this project, but loved the treat bag. Instead of the iron on transfer, I cut 3 triangles and a mouth out of black felt. I am going to blanket stitch them on with black thread.
Note from another mom: I purchased yellow glow in the dark fabric paint from the craft store for about $4. I used it to outline parts of the jack o' lanterns eyes and teeth. I also wrote BOO on the back side of the bag, under the trick or treat template. The glow in the dark paint worked very well and increases safety.
Materials:
- Halloween Iron on Transfer (I put the template and instructions for transferring on a separate page -- sometimes it's so hard to decide how to organize my website! *laugh*).
- needle and thread (or sewing machine).
- enough material for two rectangles of your chosen fabric:
- You can make them whatever size you want your treat bag to be.
- I made my first one 20 inches by 20 inches, I figured there was less chance of messing up a square than there was a rectangle *laugh*, but something 16 inches by 22 inches would be a nice size, for younger children who can't carry too much candy at once.
- If you're feeling lazy, you can just have one large rectangle and fold it in half. That way you only have one side seam to sew up. I actually like it better with two seams, though.
- I use an orange colored 50% cotton/50% polyester blend
- Use a VERY BRIGHT (fluorescent almost) orange to increase street
safety during trick or treating
- Wide (about 1 inch), heavy duty GREEN cloth ribbon (you can actually get
lime green glow in the dark ribbon at many stores) -- two 4 to 5 foot
pieces -- again, the more fluorescent the green, the better.
- Cheaper alternative: you can also create your own "ribbon" by taking green fabric (about 2 1/2 inch piece), folding it in half right sides together and sewing (with a 1/2 inch seam) all the way down, iron the seam open and use a wooden spoon or long piece of dowling to flip it right way around. The top and bottom will be sewn shut when the bag is sewn together.
- Optional: fusible sewing tape.
Instructions:
Pre-treat your fabric by washing it, drying it, and ironing out any wrinkles.
Cut your two rectangles. I used pinking shears, but you don't have to.
At this point, I applied my iron on transfer, but you can wait until the bag is sewn (just to make sure you manage to put the bag together before you "waste" a transfer).
Put your fabric right sides together and stitch up the two sides (it's up to you which way you want the bag -- deep or wide!) In other words, you choose which are the sides and which are the top and bottom. I made mine square so it didn't matter. Your seam should be about 1/2 and inch (or a smidge more... err on the side of making it too big).
Iron your seams open.
Keeping things right sides together, look for the top of the bag (if you've already ironed on your transfer, make sure you don't do things upside down!!... er, I speak from experience here *blush*). This will be the opening of the bag, so we don't want to sew it closed.
If you're using a sewing machine, zig zag stitch around the raw edge so it doesn't fray. Then fold it over about 1 inch and pin it. Iron it, being careful to make it nice and straight. Now just straight stitch all the way around, about 1/4 inch from the upper edge.
Do a second row of stitches about 1 1/4 inches from the upper edge.
If you're doing all this by hand, fold over about 3/4 inch and iron it. Now fold over another 3/4 inch and pin it. Iron it, being careful to make it nice and straight. Now just straight stitch all the way around, about 1/2 and inch from the upper edge.
Adding the Handles:
Make sure your two lengths of ribbon (store bought or home made) are the same size.
Pin one end of one of the ribbons about 1/3 of the way in from the edge on one of the sides (we'll call this side A). Make sure you make it go all the way down to the bottom hem (which we haven't sewn yet) as this will make the bag a lot stronger.
Making sure not to twist the ribbon, pin the other end of it ALSO ON SIDE A about 1/3 of the way in from the other edge. Pin it so the ends are both flush with the bottom hem. There'll be a loopy part extending over the top hem. This is the handle (it shouldn't be TOO long as the bag is for the kids to carry). Trim the ribbon a bit if the handle seems too big.
Optional: You can use fusible (iron on) sewing tape to tape the ribbons to the bag before you stitch them for a bit of extra support.
If using a sewing machine: Once you're happy with the length of the handle, start stitching the ribbon to the bag along the top hem, turn the bag and stitch the ribbon down the length of the TOP HEM (not all the way down the bag), turn the bag and stitch the ribbon along the top hem, turn the bag and stitch all the way back up. You've made a rectangle of stitching that should match the stitching you made on the top hem.
If stitching by hand: Stitch back and forth 3 times along the same stitch line as you made on the top hem.
Now repeat the entire process on Side B of the bag so you have a handle on each side.
Bottom Hem:
With machine or by hand, stitch twice along the bottom hem (leave a 1/2 inch hem). Make sure you "catch" the ribbon handles in your stitching so they don't end up flopping around everywhere on the finished bag.
Flip the bag right side out and iron it into shape.
If you haven't done it already, iron on your transfers. Make sure to put a piece of cardboard inside the bag so the colors don't bleed from one side to the other.
Woo hoo! We're done! Grab a cup of tea and be proud.
(admit moms, aren't you feeling a bit like Martha right now?)