DLTK's Crafts for Kids
Nature-Themed Macrame Wall Art

I'm always looking out for new ways to fill my walls without having to pay a humongous chunk of change... But that always seemed an impossible task. That is until I found some ways to make wall art on my own!
The best part about this macrame wall art is that it mainly uses natural materials.
Materials:
- a stick (any length that suits your wall),
- dried flowers (you can dry flowers from the garden or a bouquet from the store),
- wool, string, or hemp/twine,
- glue (hot glue is best but school glue will work with a bit of patience),
- scissors
Instructions:
 The first two steps are so much fun!
- Go for an adventure walk in the nature and search for the perfect stick.
- TIP: Make sure that the stick is thick enough to support the macrame part of this craft.
- TIP: The straighter the stick the easier it will be to macrame.
- TIP: You can also saw down the length of the stick a bit if you need to, so if you find a stick that is great but a bit too long you can always trim it down to size.
- Dry some flowers.
- The simplest way for this process is to cut the flowers and hang them upside down in a dark place for a couple of weeks.
- Go for an adventure walk in the nature and search for the perfect stick.
- Now cut strips out of wool, string, or hemp/twine.
- Depending on how long you want to make your wall art you will need different lengths of string. My biggest suggestion is make them longer than you think you will need because it is always better to have extra than not enough.
- You will also be folding the strings in half, so cut each length twice as long as you want the strings to be when attached to the stick.
- You will need to cut an even number of strings, all the same length.
 Attach each length of string to the hoop by folding it in half, wrapping the folded end around the stick, and tucking the remaining string through the fold.
 You can decide how many of these pairs of strings to attach to your string but their are some important things to remember: It is very important that you have an even number of these string paris across the whole stick. They should also be evenly spaced.
- There should be an EVEN number of string pairs.
- They should be evenly spaced.
- The closer together they are the more intricate your macrame will look.
- The more you use the more knots you will be doing.
- You will be using a square knot to macrame.
 Take four strings.
 Fold the left string over the middle two strings, creating a 4 shape.
 Take the right string and place it over the tail of the "4" string, underneath the middle two strings, and through the hole of the "4" string.
 To tighten the knot, pull on the ends of the left and right string while holding the middle strings still until the knot is in the right place.
 Now repeat steps 2-4 but in reverse (AKA make the "4" shape using the right string) to secure the square knot.
 Now we will begin to macrame. You will start by macrame tying two of the side-by-side string pairs together with a square knot.
- IMPORTANT: You need to leave one string pair free on either end of the stick (this will be used to secure the sides of the macrame).
- TIP: For the first row of square knots I found it easier to tighten it mostly to the top so that they were close to the stick, but later on it is good to keep the spaces between the knots looser because macrame should have little daimond-shaped holes through out.
 When you are ready to move on to the next row, you should have groups of four strings. Between two of those groups take the two rightmost threads from the left square knot and the two leftmost threads from the right square knot. Now you have the four strips you need to make a new square knot. Continue making square knots in rows across the stick.
- TIP: If you tape the stick down to the floor or surface you are working for, it will keep it more secure as you tie these knots.
- After completing the step above, for the second row you will be left with four spare string lengths on both ends of the stick. Tie these sets of four strings together in a square knot.
 Continue to make these rows until you have made your wall art as long as you want.
- I had to make mine long and short because my cat is very obsessed with string... *giggle*
 You can either leave the ends to dangle or cut them to your preferred length.
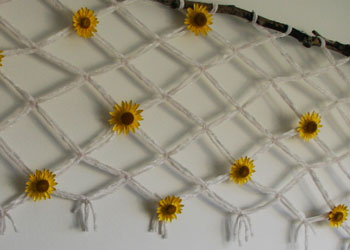 Now take the dried flowers and use some glue to secure the flowers onto some of the square knots.
- TIP: I recommend using hot glue for this step because it is much more secure and much faster. However, if you want younger children to be able to take part, you could also try letting them have a few goes at the flowers using school glue.
- If you aren't interested in using flowers, you can also try to string beads into the macrame as you knot it.
Print friendly version of these instructions