DLTK's Crafts for Kids
Buzz-worthy DIY Paper Cone Bumblebee Craft for Kids
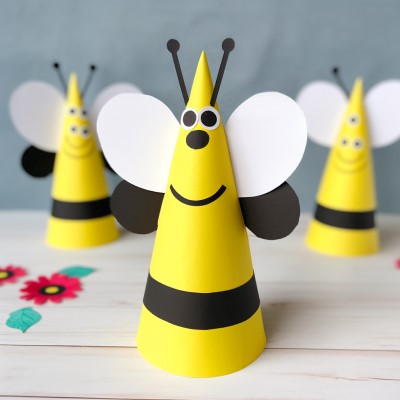

This is a simple cut and paste craft that uses a paper cone base to give it a three dimensional effect.
Welcome to our Buzz-worthy DIY Paper Cone Bumblebee Craft for Kids! This enjoyable and easy craft project offers children the opportunity to create their own adorable bumblebee. This activity is not only fun but also educational, giving kids a chance to learn about these fascinating and essential pollinators.
Materials:
- Yellow construction paper
- White construction paper
- A round plate for tracing (about 9 inches in diameter is ideal)
- A pair of scissors
- A pencil for tracing
- Black marker
- Craft glue or tape
- Googly eyes (optional)
- Black construction paper (optional)
Instructions:
- Place your plate on the yellow construction paper. Trace around the edge of the plate with your pencil. Cut out the circle you've just traced.
- Fold the paper circle in 4 equal parts. Unfold it, and you will see 4 lines intersecting at the center. Cut along one of these lines until you reach the center.
- Overlap the edges you just cut to form a cone shape. Secure it with tape or glue. This will be the body of your bumblebee.
- Using a black marker or strips of black construction paper, create 3-4 black stripes around the cone. If you're using paper, glue the strips onto the cone.
- Cut out two oval shapes from the white paper to make the wings. Attach them to the back of the bee's body.
- Now, let's make the face. You can either put the face directly onto the cone or create a separate head. To make a separate head, cut a smaller circle from yellow construction paper.
- Cut two larger circles from white paper for the eyes, or use googly eyes for a fun touch. Glue the eyes onto the face or directly onto the cone if not making a separate head.
- Use the black marker to draw a nose and a smile below the eyes.
- If you've made a separate head, attach it to the top of the cone now.
Print friendly version of these instructions