DLTK's Crafts for Kids
DIY Vertical Duct Tape Pencil Case

There is so much uncertainty right now with regard to when and how schools will be operating this September. But that doesn't mean we can't have some fun and be excited about the return to school. This duct tape pencil case is an edgy and unique addition to anyone's school supplies. It is durable and easy to use with the added bonus of being something you made with your own hands. A cool back-to-school project!
Materials:
- duct tape (1-2 colours)
- a ruler
- a marker
- scissors
Instructions:
 Gather your materials and decide if you want to use one or two colours of duct tape for your pencil case. I used two!
 Cut your duct tape into 8 pieces, each piece should be around 9 inches long. Overlap them slightly.
  Take your second roll of duct tape, or your single roll if you aren't using two, and tape strips vertically to your duct tape sheet.
 Continue doing this until most of the sticky surface is covered.
 With your marker and ruler, draw on 3 shapes:
- 12 inches long, 4 inches wide
- 5 inches long, 4 inches wide
- 1 inch long, 4 inches wide
 Cut out the pieces you drew.
 Take your 5inch by 4inch piece and flip it to the side you'd like to be on the outside. Take another strip of your other colour (or same colour), and put a piece of tape on the top edge of it. Fold it over and trim away the extra.
 Place your 5inch by 4inch piece on top of the 12inch by 4inch piece so the bottoms are lined up. Tape the bottoms together and trim the leftover tape with your scissors.
 Now, take your 1inch by 4inch piece and place it on top of your smaller piece. Take 2 pieces of tape and fold them over both sides (cut off the extra).
 On the top flap, draw 2 lines to the top of the flap and slowly bring it into the middle ( I did about ½ an inch on both sides). Cut this section out.
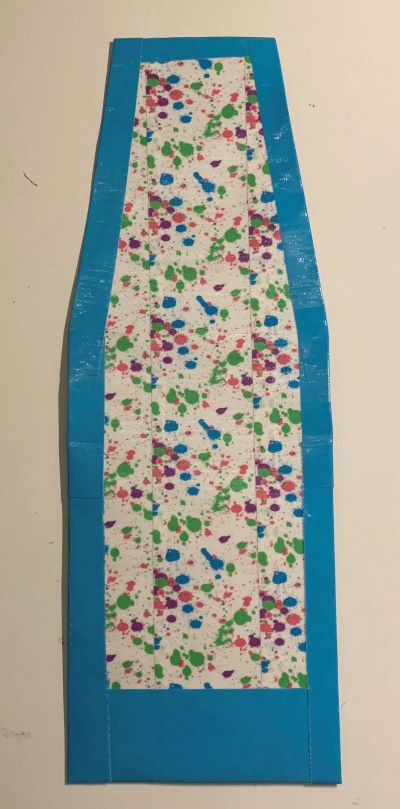 Flip it over and put small pieces of duct tape of the other colour (or the same) around the edges.
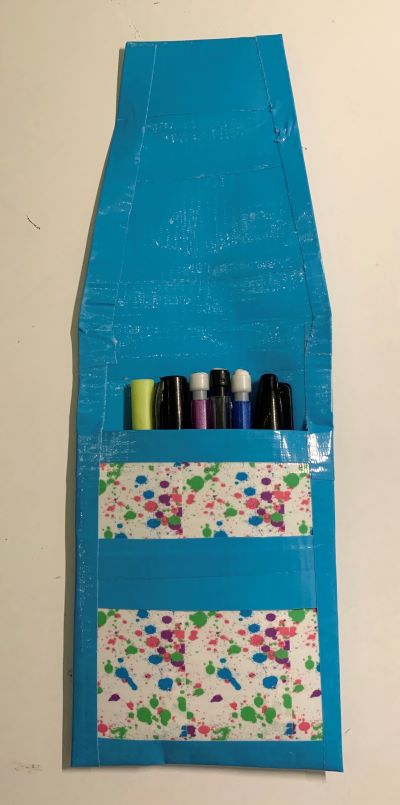 Fill it with pens and pencils and you are ready to go!
Print friendly version of these instructions

