DLTK's Crafts for Kids
Basic Origami Instructions
Origami is the art of folding a piece of paper (typically a square) into something recognizable without using glue, tape or scissors. Check here for all the origami projects on the site! NOTE: origami paper typically comes with each side a different color -- this is perfect for this project!! You can find double sided origami paper at your local craft store -- it is inexpensive.
Make sure, when folding, to be as exact as possible and to make nice crisp folds by running your finger along them, pressing them flat.
Before starting an origami project, read through these basic instructions for following an origami diagram. It will help you understand what all the scribbles and symbols mean! These symbols are "commonly recognized" and should be the same in pretty much any book or diagram you bump into.
Origami Lines:
| Symbol | Type of Fold | Image | Description | |
| Dotted Line | Valley Fold | A dotted line means to fold the paper so it looks like the fold is a valley between two hills. | 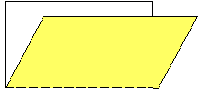 |
|
| Dots and Dashes | Mountain Fold | The opposite of a valley fold. The dots and dashed line means to fold the paper so it looks like a mountain. |  |
|
| Solid Line | Crease | A solid line represents the crease you can see from a fold that has been made. | 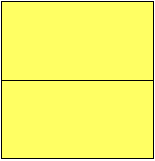 |
Origami Arrows:
| Symbol | Image | Description | |
| Single Line Arrow | Fold in the direction of the arrow. |  |
|
| Double Line Arrow | 
or
|
Fold, crease and then unfold. | 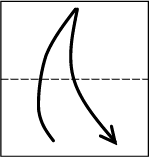 |
| Looped Arrow |  |
Flip your paper over. |
 |
Make a rectangular piece of paper into a square:
| Mountain fold the top corner of paper over. |  |
| Cut off the small rectangle below the triangle you just formed. |  |
| Unfold and now you have a square (with a crease). | 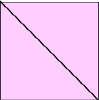 |
Print friendly version of these instructions