DLTK's Crafts for Kids
Macrame Produce Bag with a Fringe Bottom

Do you have an old t-shirt with a hole in the sleeve, a stain on the front, or you just never wear anymore? This is a perfect project for repurposing an old t-shirt into an adorably fringed, macrame bag. These bags are like the classic produce bag and are great for carrying around fruits and veg, but you can get creative and carry around some other items like books or sports equipment.
This craft is suitable for older children and adults. It does not require many materials and can take anywhere from 1 to 4 hours depending on how comfortable you are tying knots and whether you will sew by hand or use a sewing machine. I love preparing a few of these bags (getting them ready to knot) and keeping them beside the couch to macrame while I watch a show or film!
Materials:
- old t-shirt (it is best to use a classic cotton t-shirt without any logos),
- scissors,
- safety pin,
- basic sewing supplies (needle, thread, and pins)
Instructions:
 Lay your old t-shirt flat and use a pair of scissors to carefully cut off the sleeves, top, bottom, and sides (in that order).
- TIP: Cut off as little as possible while still removing all of the hems and seams.
- You should be left with two rectangular sections of t-shirt fabric. (Don't worry if there is a little bit of curve to the rectangle where the sleeves used to be).
 One rectangular section at a time, fold the bottom edge down about 3/4" down and pin it into place.
 Sew this new hem into place at approximately 1/2" on both rectangles of t-shirt fabric.
- TIP: A sewing machine is the fastest way to do this but you can also hand sew a basic running stitch if that is all you have available.
 Using scissors cut the rest of the rectangle into finger-width strips, stopping about 1/2" before the sewn hem.
- TIP: You can stack one rectangular section on top of the other to make this go faster but I prefer to cut one section at a time because it is a little bit easier to cut nicely.
 Tug on all of the strips of t-shirt fabric. If the t-shirt is made out of cotton material the strips should turn string-like.
- TIP: Some t-shirts have logos that are ironed on. Avoid using these t-shirts because the strips of fabric will remain rigid around the logos and be harder to macrame.
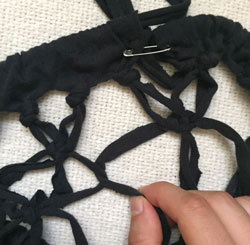
 Take the bottom hem of the t-shirt (the part that you cut off at the beginning) and cut it so that it is one long strip of fabric instead of a loop. On one end of this long strip of fabric attach a safety pin.
 Feed the long strip of fabric through the top part of both sections of the t-shirt. The safety pin should make this easier.
- TIP: When you feed the strip of fabric through make sure that the insides of the t-shirt sections are facing the same way so that the folded over edge will be on the inside of the bag.
 Use a loop knot to tie together a pair of strips. Continue until all of the strips are in a pair.
- TIP: You should have an even number of pairs. If you have an extra pair just cut it off below the hem.
- You will be using a square knot to macrame.
 Take four strings.
 Fold the left string over the middle two strings, creating a 4 shape.
 Take the right string and place it over the tail of the "4" string, underneath the middle two strings, and through the hole of the "4" string.
 To tighten the knot, pull on the ends of the left and right string while holding the middle strings still until the knot is in the right place.
 Now repeat steps 2-4 but in reverse (AKA make the "4" shape using the right string) to secure the square knot.
 Using the square knot above, tie four strips together at a time until all of the strips have been tied.
- IMPORTANT: Leave one pair of strips free on both ends. These will be used to secure the macrame into a bag shape later so ignore them while you work on the macrame rows.
- TIP: Don't tighten the knot all of the way up. Macrame has little daimond-shaped holes through out, so it is okay for their to be a space between the square knots and the top of the bag.
 When you are ready to move on to the next row, take the two rightmost threads from the left square knot and the two leftmost threads from the right square knot. Now you have the four strips you need to make a new square knot.
- TIP: Make sure to continue leaving those daimond-shaped holes while you macrame! I like to focus on making each daimon shape the same size through out the bag.
 Continue making rows of square knots until you begin to near the end of the strings. Save about 3" of string for the fringe at the bottom.
- TIP: Hang it around something like the back of a chair. Having it suspended makes it easier to tie the knots.
 When you are done making your square knot rows, fold the rows in half to make the bag shape and attach the two ends of the bag together with a safety pin at the very top.
- TIP: I actually ended up stitching this section into place with a needle and thread when I finished my bag so that the top of the bag stayed in a circular shape all the way around. It is up to you whether you'd like to hold it in place with a safety pin, a few stitches, or just leave it loose.
 Now that both sides of the bag are aligned go to the fringe at the bottom. Tie a string from one side and a second string from the other side together using a loop knot. Continue doing this for all of the strings at the bottom to seal the bottom of the bag.
- TIP: Start with the strings on the side of the bag that isn't connected yet; this way you can be sure you are aligning the sides of the bag up correctly.
 Remember those two pairs of strings that we left on either end of the square knot rows? Well those should be next to each other now that it is folded into a bag shape.
- Use those four strings to begin tying square knots. In between each set of knots take the two outermost strings and thread them through the outside loops of the bag's square knot rows. Continue until you reach the bottom of the bag. This will join the two sides of the bag together.
- TIP: The last square knot you do should be quite tight to the bottom of the bag, this way there won't be a larger hole in the bottom corner.
 Now you can take your scissors and cut the string of the bottom fringe to the same length.
 If you want your bag to have two handles, you can pull the handle out from the middle where the two t-shirt rectangles are slightly separated.
- TIP: Make sure to secure the handle back into a loop shape with a loop knot so that it doesn't fall out of the hem.
Print friendly version of these instructions