DLTK's Crafts for Kids
 Paper Maché Tiger Book Ends
Make two identical tigers or two different animals for these cute bookends. Makes a great gift from the kids.
Materials and directions are for ONE book end.
Materials:
- milk carton
- something heavy (rocks work perfectly and are fun to collect outside, but you can also use dried beans, dried rice or sand)
- scrap cardboard (the corrugated kind is best) If you only have thin cardboard, then you can just layer it together.
- newspaper
- ONE OF: white glue, mod podge OR paper mache paste (1 part flour to 4 parts water... Boil about 3 minutes stirring constantly, add 2 ice cubes and let cool)
- scissors
- masking tape
- poster or tempra paint -- orange
- paintbrush
- black marker or paint
- Optional: exacto knife
- Optional: spray varnish
Instructions:
 Prepare your paper mache paste right away so it has time to cool (if
using the boil method). I like boiled paste as it's smoother and
takes a lot less flour (the REDUCE part of the three R's!).
Prepare your paper mache paste right away so it has time to cool (if
using the boil method). I like boiled paste as it's smoother and
takes a lot less flour (the REDUCE part of the three R's!).- Print out the template -- the templates are B&W (or you can choose to do this free hand).
- Cut out the template pieces and lay them on a piece of corrugated cardboard.
- Trace the pieces onto the cardboard
 Cut them out with scissors or an exacto knife. I recommend an
adult help with this as the cardboard is difficult to cut.
Especially the mane (TIP: have the adult cut out a smooth circle
for the mane first and then let the child snip in little triangles to make the jagged edge. This is a lot easier than trying to cut
the jagged edge from the cardboard as you go.).
Cut them out with scissors or an exacto knife. I recommend an
adult help with this as the cardboard is difficult to cut.
Especially the mane (TIP: have the adult cut out a smooth circle
for the mane first and then let the child snip in little triangles to make the jagged edge. This is a lot easier than trying to cut
the jagged edge from the cardboard as you go.).- Cut the top off the milk carton. This may require adult assistance.
- Measure the bottom of the carton (it should be about 5
inches).
- Measure up the same height on the milk carton and make a mark.
- Cut down from the top until you reach the mark you made.
- Fold over the edges so you have a perfect box (it doesn't have to be a complete cube, but it helps the kids practice measuring.)
 Fill the box with something heavy (we used rocks and had lots of fun
collecting them).
Fill the box with something heavy (we used rocks and had lots of fun
collecting them). Refold the edges and tape TIGHTLY.
(you may notice we are always using this odd green masking tape in our crafts... er, you don't have to use green -- you can use the regular color).- Tear strips of newspaper about 1 " wide and as long as you want.
- Dip in the paper mache paste, but then remove excess paste (I run it through my fingers to do this).
 Cover the milk carton cube, in no more than 4 layers of paper
mache (I always tell the kids no more than 2 as they always put on too
much *grin*). If you put on more than 4 it will likely mold
before it dries.
Cover the milk carton cube, in no more than 4 layers of paper
mache (I always tell the kids no more than 2 as they always put on too
much *grin*). If you put on more than 4 it will likely mold
before it dries. Cover each of the cut out pieces with paper mache (all the way
around). Again, no more than 4 layers.
Cover each of the cut out pieces with paper mache (all the way
around). Again, no more than 4 layers.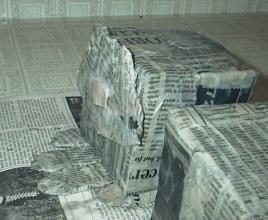 While it's still wet, arrange the head pieces together on the front
of the cube.
While it's still wet, arrange the head pieces together on the front
of the cube.- Let dry COMPLETELY. It goes faster in a warm breezy place. If it's a nice day, just stick it outside (just don't forget it if it starts to rain). It takes a day or so to dry.
- Optional: apply a second layer of mache. The more layers you add, the sturdier it will be. We applied a second layer, but we only did one layer, not 4 this time. That just made sure all the parts stayed firmly in place.
-
 Optional: we always use scrap white computer paper or toilet
paper (don't laugh) for the final layer of all of our paper mache
projects.
Optional: we always use scrap white computer paper or toilet
paper (don't laugh) for the final layer of all of our paper mache
projects.
- it takes less paint to cover.
- I find newspaper needs two coats of paint, whereas the white paper only needs one.
- Toilet paper gives a rough texture which is nice for some animals.
- We used computer paper for our tiger.
- Paint the whole thing orange (we didn't paint the bottom).
- Use a black marker or black paint to add facial features.
- Let dry.
-
Optional: cover in a coat of clear varnish. This will
make it last longer (especially since poster paints aren't water
proof),
Printing Templates:
- Close the template window after printing to return to this screen.
- Set page margins to zero if you have trouble fitting the template on one page (FILE, PAGE SETUP or FILE, PRINTER SETUP in most browsers).
Tiger Template
You can use this same idea with slightly different paint decoration to make all sorts of animals. I've included a few templates to inspire you.
Cat Template
Cow Template
Dog Template
Pig Template
Print friendly version of these instructions