DLTK's Crafts for Kids
Paper Mache Crafts
Younger children may or may not enjoy making these crafts. It depends on if they enjoy getting gooey. If you're willing to give the little ones a fair amount of one on one help, the paper mache and painting portions of these crafts can be rewarding for children as young as age 3.
But if you're looking for a fairly solo project for the kids or if you're working with a large group, stick to the age ratings suggested. (If the group is very large or the kids are new to crafting, you may want to even add a year or two to the age rating).


 Penguin Paper Mache Craft


Seed Starter Paper Mache Craft
greeting card optional
Plant these paper mache shapes in the ground and watch them grow into a beautiful wildflower garden!


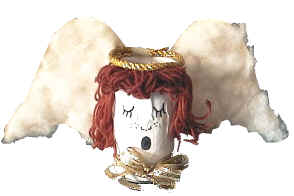
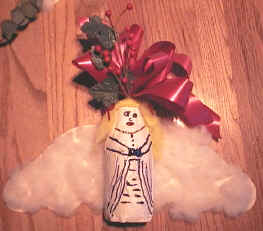


 Ornament Paper Mache Craft

|
|
 |
|
 |
|
 |
|
 |
Paper Mache Frog Craft Easy Version of the Frog Craft Use this craft for the 5 green speckled frogs game |
 |
|
 |
|
 |
|
 |
|
 |
|
 |
|
 |
|
 |
|

Tips and Tricks for Paper Mache:
Paper mache is a fun, inexpensive, and versatile crafting technique that can be used to create a wide range of objects, from decorative bowls to full-sized sculptures. Here are some tips and tricks to help you get the most out of the flour and water method:
- Prepare Your Work Area: Paper mache can be messy. Cover your workspace with newspapers or a disposable tablecloth to make clean-up easier.
- Make Your Paste: Create a paste from one part flour to two parts water. You might need to adjust the ratios slightly depending on the consistency you prefer. The paste should be similar to a pancake batter.
- Use a Whisk for Mixing: A whisk can help you break up lumps in your paste. This will ensure a smoother, more even coating on your paper strips.
- Strip Size Matters: Cut your newspaper into strips of about 1-2 inches wide. The length can vary depending on the project. Smaller, shorter strips are better for detailed or small projects, while longer ones work well for larger or less intricate works.
- Consistency is Key: Try to keep the layers of paste on your strips consistent. If you apply too much, it can lead to a sloppy finish and longer drying times, while too little may not hold the strips together well.
- Layering Technique: Always apply your strips at an angle, and alternate the direction with each layer. This helps to create a stronger, more stable end product.
- Drying Time: Let each layer dry completely before applying the next. This can take anywhere from a few hours to overnight, depending on the thickness of your layers and the humidity in your environment. Rushing this process can result in a weaker structure.
- Number of Layers: For most projects, around 3-4 layers of paper mache is enough, but for larger or weight-bearing projects, you may need more.
- Balloon Base: If you're creating a hollow object, a balloon can be a great base. You can apply the paper mache directly onto it and then pop the balloon once everything is dry.
- Final Layer: Consider using a layer of white computer paper or tissue paper for your final layer. This will give you a blank canvas for painting and make the colors stand out better.
- Sealing: Once your project is fully dry, you might want to seal it with a layer of varnish or mod podge. This can help to protect it and give it a nice, finished look.
- Patience: Paper mache is not a quick craft. It requires time, especially when drying between layers. Make sure you have enough time and patience to complete your project without rushing.
- Recycling: Old newspapers, junk mail, or other types of paper can be used in paper mache. It's a great way to recycle these materials.
- Sanding: After your project has fully dried, you can sand it lightly with fine-grit sandpaper to smooth out any bumps or rough spots before painting.
- Cleanup: Remember to clean your utensils and bowl as soon as you're done with them. Dried paste can be difficult to remove.
Remember, the most important thing is to have fun and let your creativity shine. There's no right or wrong way to do paper mache, so feel free to experiment with different shapes, colors, and techniques.
Happy crafting!
Leanne
