DLTK's Crafts for Kids
Create Your Own Decorative Paper Mache Bowl: A Step-By-Step Tutorial
Embrace the joy of crafting with this fun guide on how to make your own decorative paper mache bowl. Whether you're new to the world of paper mache or an experienced DIY enthusiast looking for a new project, this tutorial is perfect for you.
Paper mache is an art that transcends age, providing a fun and creative activity for both kids and adults. Not only is it a fantastic way to recycle old newspapers, but it also allows you to create beautiful, custom-made pieces of art right at home. Follow this step-by-step tutorial to create your own decorative paper mache bowl, perfect for displaying trinkets, serving dry snacks, or simply for decoration.
Materials:
- Old newspapers
- Balloon
- All-purpose white flour
- Water
- Mixing bowl
- Paintbrush
- Acrylic paint (optional)
- Clear acrylic sealer or varnish (optional)


Instructions:
- Create Paper Mache Paste: In a mixing bowl, combine one part flour with one part water to create a smooth, pancake-batter-like paste.
- Prepare the Balloon: Inflate the balloon to the size you want your bowl to be. Place the balloon in a bowl with the tied end facing downwards to keep it steady.
- Apply the Paper Mache: Tear the newspaper into strips. Dip each strip into the paper mache paste, ensuring it's fully coated. Place the strips onto the balloon, smoothing out any bumps or bubbles with your fingers or the paintbrush. Cover the top half of the balloon with about three layers of newspaper strips, leaving the bottom half bare.
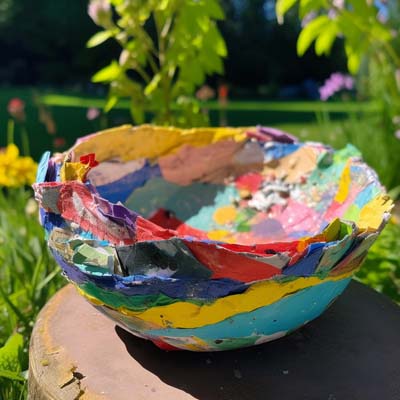
You can use some colored strips of magazines or tissue paper to paper mache to make a more colorful bowl if you don't want to paint it at the end. A scrunched layer of tissue paper on top also makes a very nice texture for your bowl. - Let it Dry: Allow your paper mache bowl to dry completely. This can take up to 24 hours, depending on the thickness of your layers and the humidity in your room.
- Second coat: I like to add a second coat of paper mache at this point and let it dry another 24 hours. This makes the bowl a bit more sturdy.
- Pop the Balloon: Once the paper mache is dry, pop the balloon and carefully remove it from your bowl.
- Trim the Edges: Use a pair of scissors to trim the edges of your bowl to your desired shape and smoothness.
- Decorate Your Bowl (Optional): Paint your bowl with acrylic paint, if desired. Let the paint dry completely.
- Seal Your Bowl (Optional): If you'd like your bowl to have a glossy finish or plan to use it for food, seal it with a clear acrylic sealer or varnish and let it dry completely.
Congratulations! You've just made your very own paper mache bowl. Whether you place it on a shelf, use it as a holiday decoration, or give it as a gift, this DIY craft is sure to bring a touch of charm.
Happy crafting!
Leanne
Print friendly version of these instructions.