DLTK's Crafts for Kids
Alligator Craft
 There are only two countries in the world that have alligators.
The alligators in China are an endangered species. American
alligators are not -- they live from the Carolinas to Florida and
along the Gulf Coast.
There are only two countries in the world that have alligators.
The alligators in China are an endangered species. American
alligators are not -- they live from the Carolinas to Florida and
along the Gulf Coast.
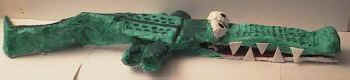
To give you a feel for the size, the alligator in the picture is about 2 feet long (and it's mouth opens and shuts!!) To see a full size photo, click here (close photo window when done viewing, to return to this screen)
My 6 year old helped a little bit and both of my girls really liked the end product, but I'd say the craft should be made by Age 8+.
Materials:
- The only "store bought" material is green paint (tempra, poster or finger paint all work well... Acrylic paints work great, but don't wash out of clothes!!!) If you don't have green paint, green tissue paper or napkins will work too. My alligator took about 2 oz (100 ml) of green paint.
- paint brush
- Optional: white paint and red paint (the craft works fine without these)!
- newspaper
- ONE OF: egg carton (styrofoam) OR cardboard (empty cereal boxes work well!)
- ONE OF: white tissue paper, white kleenex, white paper towel OR white toilet paper
- scissors
- tape (masking or scotch tape)
- ONE OF: white glue, mod podge OR paper mache paste (1 part flour to 5 parts water... Boil about 3 minutes and let cool)
 STEP 1: BUILD THE FRAME:
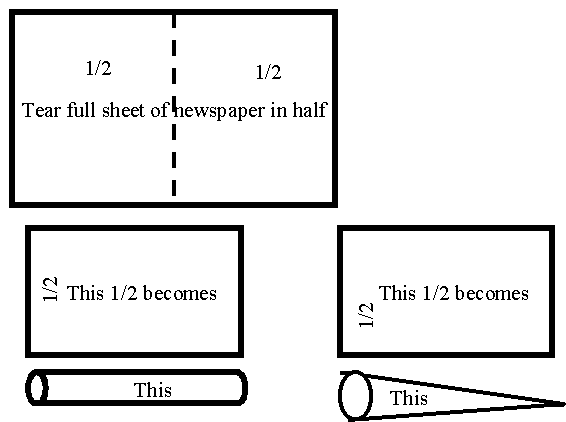
Take one piece of newspaper. Cut it in half along the crease.

Take one 1/2 and roll it into a long, loose sausage
Take the other 1/2 and roll it into a long cone.
Fold the sausage in half (this will be the alligator's jaws ), but make the top half a bit longer (about 4 to 6 inches longer) than the bottom half.

Roll the longer piece to make the snout. Tape snout well!
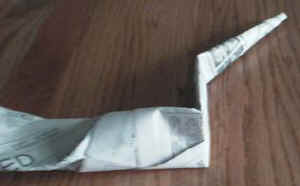
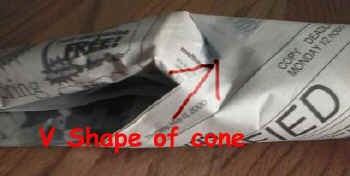 Take a good look at your cone shape. There should
be a V shape at the open end. Insert the jaws so the V
side is on the top of the alligator. Tape the jaws and
cone together well (top and bottom)
Take a good look at your cone shape. There should
be a V shape at the open end. Insert the jaws so the V
side is on the top of the alligator. Tape the jaws and
cone together well (top and bottom)
 Now it should look like this
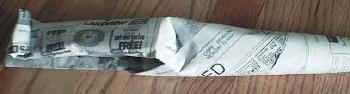 or here is the view from above
Alrighty! We're doing well...
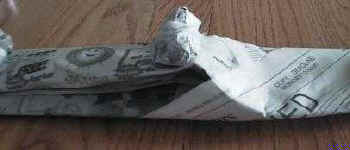
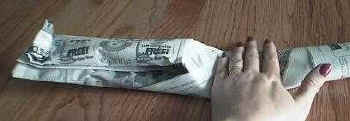 Now press the alligator's back so it is flat
(just below the jaws)
Now press the alligator's back so it is flat
(just below the jaws)
 Fold the part just below the flattened back to the left
and then fold in half again to the right (Z-shaped). Pinch/crease.
Fold the part just below the flattened back to the left
and then fold in half again to the right (Z-shaped). Pinch/crease.
 Let go so you get a zig zag tail if it
didn't zig zag enough, pinch/crease it harder!
Let go so you get a zig zag tail if it
didn't zig zag enough, pinch/crease it harder!
 Now the eyes... Make two newspaper balls (about 1 inch balls)
and tape them really well/tightly so they don't unscrunch.
Then tape them to the top of the alligator's jaws.
Now the eyes... Make two newspaper balls (about 1 inch balls)
and tape them really well/tightly so they don't unscrunch.
Then tape them to the top of the alligator's jaws.
 And last the legs (your alligator may be a bit wobbly up
to this point... Don't worry!). Make two more newspaper
sausages long enough to stick out at least an inch on either
side of the alligator. Roll nice and tightly this time
so he has sturdy legs. Tape well to the bottom of the
alligator.
And last the legs (your alligator may be a bit wobbly up
to this point... Don't worry!). Make two more newspaper
sausages long enough to stick out at least an inch on either
side of the alligator. Roll nice and tightly this time
so he has sturdy legs. Tape well to the bottom of the
alligator.
I should have put them a bit farther apart than I did, I think.
You're now done your frame (that's the toughest part, but it's amazing what you can do with newspaper, isn't it!?!)
STEP 2: MAKE HIM SOLID:
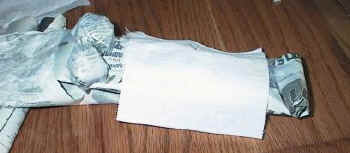
Take your white tissue paper (toilet paper, kleenex or paper towel will also work... We used toilet paper *grin*). The white paper (whichever kind you chose) will make him more solid and will make it easier to paint him (less paint required than if you were painting over newspaper).
Suggestion from a viewer:
"You could paper
mache it with green crepe paper and just fill in the details
with paint, and maybe it would make it harder." Thanks
Robert!
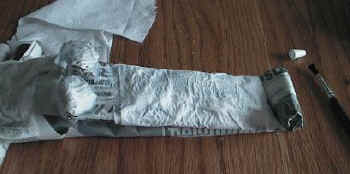 Coat your alligator with mod podge, paper mache
paste or white glue dilluted 1/2 and 1/2 with water (we choose
the white glue/water solution and painted it on with paint brushes).
Coat your alligator with mod podge, paper mache
paste or white glue dilluted 1/2 and 1/2 with water (we choose
the white glue/water solution and painted it on with paint brushes).
The tissue will soak onto the alligator in a minute or two. Use your paint brush and some more glue/water solution to get the toilet paper wetter when necessary and into all the crevices. Don't forget to do the inside of the mouth!. Use scissors to clip off exess as necessary.
 Let dry (likely overnight). At various stages, you'll
be letting him dry (now and while painting). I always propped
his jaws open with a lightly crumpled piece of newspaper whenever
he was drying so his jaws didn't stick shut.
Let dry (likely overnight). At various stages, you'll
be letting him dry (now and while painting). I always propped
his jaws open with a lightly crumpled piece of newspaper whenever
he was drying so his jaws didn't stick shut.
STEP 3: PAINT HIM
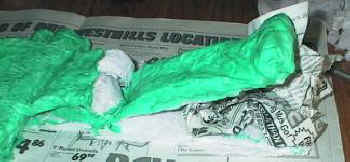
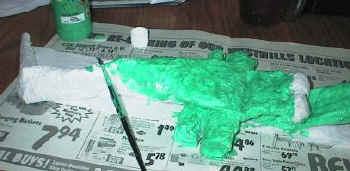
Take your green paint and paint your alligator (except his eyeballs). If you have red paint, leave the inside of his mouth unpainted. If you don't have red paint, paint the inside of his mouth green.
 If you don't have paint at all, you could use
green tissue paper or napkins and the same paste/process as
in STEP 2.
If you don't have paint at all, you could use
green tissue paper or napkins and the same paste/process as
in STEP 2.
Let dry.
Turn him over and paint the bottom (his belly) if you want to. You can paint it a lighter green or a creamy color if you want... BE CREATIVE (you said you wanted to be! *grin*)
Let dry.
 If you have white paint and/or red paint, paint
the inside of the mouth red and the eyeballs white (the eyeballs
are pretty white without the paint, so it isn't the end of the
world to skip painting them)Tasha liked painting the mouth!
If you have white paint and/or red paint, paint
the inside of the mouth red and the eyeballs white (the eyeballs
are pretty white without the paint, so it isn't the end of the
world to skip painting them)Tasha liked painting the mouth!
Let dry.
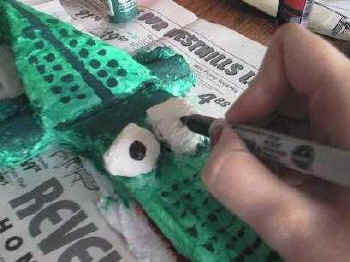 Take some markers (or other colours of paint) and draw on
some detail: black eyeballs on the eyes, nostrils on the
snout and darker green splotches on the back and top of the
jaw. I also drew a line down the center from his jaws
to the tip of his tail.
Take some markers (or other colours of paint) and draw on
some detail: black eyeballs on the eyes, nostrils on the
snout and darker green splotches on the back and top of the
jaw. I also drew a line down the center from his jaws
to the tip of his tail.
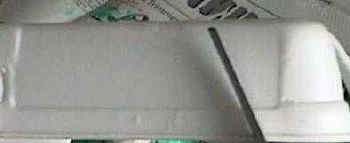 Take a styrofoam egg carton and find some flat, white parts
(you can substitute cardboard with white paper glued onto it!)
Cut out teeth shapes...
Take a styrofoam egg carton and find some flat, white parts
(you can substitute cardboard with white paper glued onto it!)
Cut out teeth shapes...
...and glue them onto your aligator's jaws.

Guess what? You're done!
(You can cover with a few coats of clear varnish if you want a shiny alligator you can leave outside in the garden!)
Print friendly version of these instructions