Powerpuff Girls Birthday Cakes
My 7 year old likes Dairy Queen ice cream cakes so I haven't had to bake for her too
often (I'm not very fond of baking), but this year we had the party at the movie theater
and there was no where to keep an ice cream cake. (er, and Tasha seemed rather
enthralled by the Blue's
Clues cake we did for her little sister and wanted to help make one for her party).
Here's a different alternative for PPG
cakes.
Materials:
- one or two cake mixes, depending on whether you want an extra round cake - it doesn't
matter what flavour... we actually mixed chocolate and white so people had their
pick. We needed an extra round cake for the party with the family later in the day.
- two containers of white icing (or you can make your favorite kind)
- a round pan (and another pan if you decide to make a second cake mix. The second
cake can be whatever shape you want)
- food color drops (red, yellow and blue) You can also use paste for more vibrant
colors
- chocolate cake sprinkles and/or black licorice strings (if you like them)
|
 |
| I originally made a bubbles cake. I received a note
from a viewer who's daughter's favorite PPG is Blossom. You can see
her cake to the right. Here's what she had to say:
Just a quick note to thank you for the great web site! I use it quite a bit, and was delighted to find the Powerpuff Girl section! My
daughter had a Powerpuff Girl theme for her 5th birthday. Her favorite character is Blossom, so I altered the Bubbles birthday cake
to make Blossom. She loved it! Instead of dark sprinkles to outline I used a small tube of black gel frosting from the store, it
worked great. I used red sugar for the hair bow as I can't find any red frosting that's
actually edible. Thanks so much for your great ideas! See the attached picture for the finished product.
Nicki
|

|
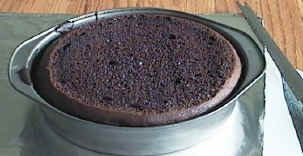
- Bake your cake according to package directions
Kimberly adds the following tip: "P.S. I found it easier to remove the
cake in one piece from the pan when I buttered the bottom of the pan and sprinkled on
flour before putting the batter in."
- Let cool (I did this the night before and didn't really let it cool enough... it really
should be completely cool before you start)
- If your cake has a bulging center, trim it a bit so it's flat on top
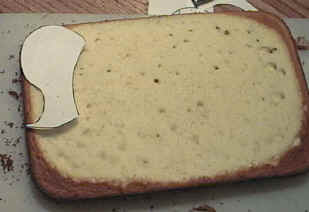
- Turn the cake out onto a piece of tinfoil. (or cake board)
- If you have time to leave it sit for 24 hours at this point, that's your best bet (it's
less crumby if you do).
- cut out the template pieces
- Put the ponytail piece on the spare cake (either the extra rectangle or the second round
cake)
- Carefully cut around the pieces with a sharp knife
- You'll need to flip the ponytail piece over to make the second one.
- Remove the template from the cake
- Remove all the scraps and put them aside (try not to rip the cake when you're removing
the scraps). You may want to use some of the scraps at the end to make mini heart or
bubble cakes... we'll talk about that in a bit.
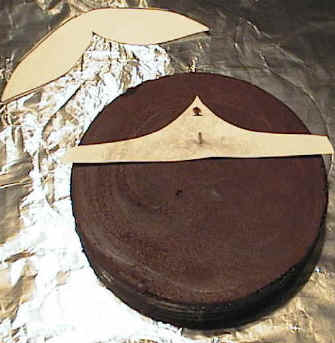
- Arrange the cake on a covered board (we used our cutting board and just covered it with
tinfoil). Make sure all the pieces are touching properly.
- The ponytails may not be exactly the same height as the face... that's OK! It just
adds to the 3D look.
- Notice that I've used the "scrap" piece of template from under the hair to
guide where I put on the yellow icing.
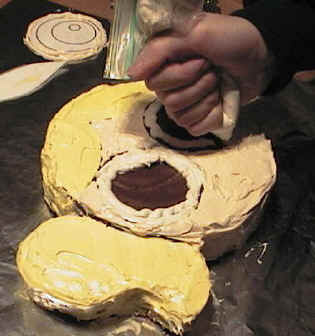
- Mix some yellow icing. You never want too little icing as it'll be tough to match
the color if you have to mix a second batch, so err on the side of caution. We made
1/2 of one icing container yellow. Julieanne adds that if you add 1 to 2 Tbsp of
corn syrup to the icing it will spread much better and you won't get as many crumbs!
- Spread yellow icing onto the bangs (using the template to give you a nice edge) and onto
the ponytails. I just used a butter knife for spreading.
- If you get crumbs on your knife, get a new knife (it sounds simple, but it took me
awhile to realize how helpful it would be to switch knives when they got crumby)
|
|


|
- Put the top part of the hair template over top of the yellow bangs. Cut out two
eye templates (two get the second eye, just trace the one I provided onto a piece of paper
to make a second one). Arrange them on the cake. They look BIG but powerpuff
girls have big eyes so don't worry.
- Spread some skin colored icing onto the face. To make skin color take white icing
and mix in a little red and a little yellow (very little or you'll end up with orange
instead of skin color). You can use left over yellow icing, mix it with white icing
and a drop of red food coloring so you don't waste any icing.
|
- Remove the template pieces.
- Pipe a circle of white icing around the "hole" left for the eyes
- I use ziploc bags with an end snipped to pipe icing, but if you bake more than I
do you likely have the proper tools for this.
- Now mix some blue icing and pipe that in to FILL the rest of the hole (I realize she has
dark centers, but we're going to handle that with sprinkles).
- Sprinkle chocolate sprinkles in a circle in the center. You can use the template
piece to help or you can do it free hand.
- Put a dot of white icing in the middle of the chocolate sprinkles.
- Mix some pink icing and pipe on a smile (or use red string licorice).
- If you (or your child *grin*) is patient, you can outline some of the edges with
chocolate sprinkles or black string licorice
- We weren't sure the cake would be large enough for all the kids we had coming so we cut
around a heart shaped cookie cutter to make three extra mini heart cakes (single serving
size). You could also make round "mini bubble" cakes (just ice them blue
and call them bubbles)
|
|
Different computers work a bit differently in terms of
how they print. If the first template does not work for you, try this one
instead:
Template: black &
white
I know for sure that WEB TV users will need to use this version