DLTK's Crafts for Kids
Fluffy Puffy Feather Pens
 I'm not sure which my daughters like more -- making these pens or using
them. Either way, it's a popular craft in our house. We make
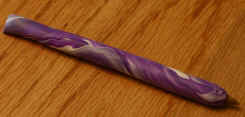
two different versions: Ribbon (shown)
and Clay. Directions for both are on this page.
I'm not sure which my daughters like more -- making these pens or using
them. Either way, it's a popular craft in our house. We make
two different versions: Ribbon (shown)
and Clay. Directions for both are on this page.
Sculpy Clay Pens (age 7+)
Materials:
- regular pen
- sculpy clay in two different colors that look nice together
- They cost about $3 per package
- 1 pkg of each of two colors (ie 2 pkgs) will make 5 or 6 pens
- oven,
- baking tray (cookie sheet).
- feathers
- to get a really poofy pen, we used an old feather boa and just snipped off a couple of inch long pieces of it. You can find these at craft stores, costume stores and sometimes even the dollar store. They're also fairly common at garage sales (old halloween costumes). A brand new one from the craft store costs about $8 and will give enough pieces for about 15 pens.
- you can also use a few plain feathers... just keep adding them until you're happy with the look (about 5 or 6 feathers is nice)
Instructions:
 remove pen from it's casing
- let the children use their imagination on how to use their
clay.
- my younger daughter Kaitlyn likes to mix her colors together to
give a marble effect.
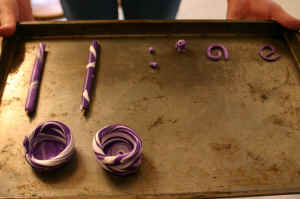
- Just roll out a long snake of each color
- Put the snakes side by side roll them together.
- Folding the snake and roll some more
- Keep folding and rolling until the clay looks how you want it (if you keep doing it, the colors will totally blend to give you a new color)
- my older daughter Tasha likes to use one main color and then decorate it with stripes or polka dots of the second color.
- my younger daughter Kaitlyn likes to mix her colors together to
give a marble effect.
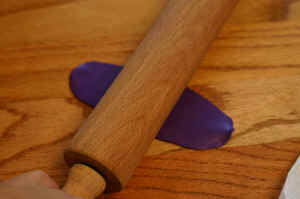
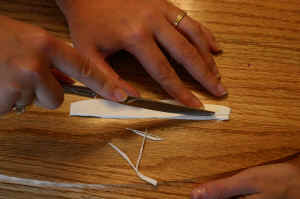
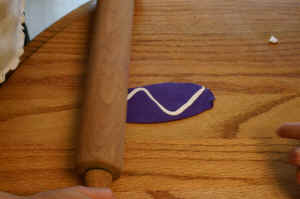
 Make a fairly fat snake and then flatten it with your hands.
Roll it very flat with a rolling pin.
Make a fairly fat snake and then flatten it with your hands.
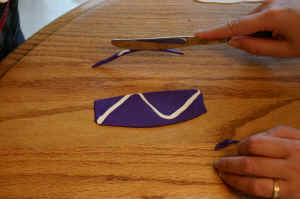
Roll it very flat with a rolling pin.- make sure your rectangle is as long as your pen.
- trim the edges so your rectangle is rectangular
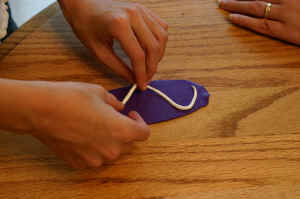
- Place the pen (WITHOUT its casing) on the clay with the writing part sticking out.
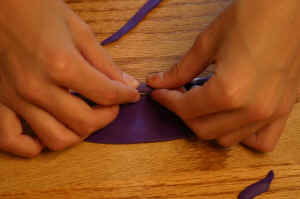 Roll the clay around the pen.
- Trim off any excess.
- smooth the edge by rolling the pen a couple of times.
- Trim off the end (non writing part) a little bit.
 you can make other things with the extra clay (or just make more
pens).
you can make other things with the extra clay (or just make more
pens).- bake at 250F (about 125 C) for 10 minutes.
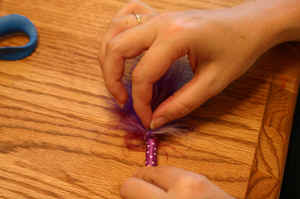 put a dab of glue at the end of the pen and attach a feather or a
feather boa piece.
put a dab of glue at the end of the pen and attach a feather or a
feather boa piece.- flip the pen over and attach another feather boa pin (or another feather).
- if using feathers, continue to rotate the pen and glue feathers on until the end is covered on fluffy (4 to 6 feathers)
To make stripes or polka dots:
|
 |
|
 |
|
 |
 Ribbon Pens
(age
10+)
Ribbon Pens
(age
10+)
Younger children love these pens too, but it requires hot glue to make them. They're nice gifts for babysitters or older siblings to give to younger ones.
Materials:
- regular pen with no handle or fancy bits to it (it needs to be a basic pen so you can wrap the ribbon around it)
- ribbon in a favorite color or pattern (about 2 feet... Though the wider the ribbon the less you'll need)
- feathers
- to get a really poofy pen, we used an old feather boa and just snipped off a couple of inch long pieces of it. You can find these at craft stores, costume stores and sometimes even the dollar store. They're also fairly common at garage sales (old halloween costumes). A brand new one from the craft store costs about $8 and will give enough pieces for about 15 pens.
- you can also use a few plain feathers... just keep adding them until you're happy with the look (about 5 or 6 feathers is nice)
- hot glue gun
- scissors,
- a friend (an adult could do it solo)
Instructions:
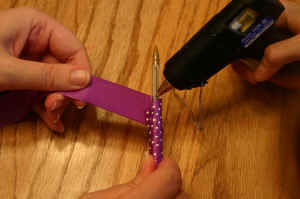 This project is best done with a friend -- one does the glue and the
other does the wrapping.
This project is best done with a friend -- one does the glue and the
other does the wrapping.- Put a dab of hot glue at the end of the pen and attach your ribbon at an angle.
- wrap the ribbon around the pen once.
- Put another dab of hot glue on the pen and wrap again.
- continue dabbing and wrapping until the pen is covered in ribbon.
- Snip off the ribbon.
- Put a bit of extra glue and use a popsicle stick or the back of
another pen to secure the ribbon really well.
- Put a dab of glue at the end of the pen and attach a feather or a feather boa piece.
- flip the pen over and attach another feather boa pin (or another feather).
- if using feathers, continue to rotate the pen and glue feathers on until the end is covered on fluffy (4 to 6 feathers)
Print friendly version of these instructions