DLTK's Crafts for Kids
Upcycled Coat Pillow

I have a running tab of decorative things that I would love to get for my home, but I try not to buy them new and sometimes even find a way to make them! This is one of my favourite decoration projects yet! I had an old winter jacket in my closet that wasn't quite warm enough for Calgary winters and I was so thrilled to find a use for it.
I think this is a fun project for several reasons. First, if the fabric starts as a jacket, your sewing is halfway done already, which makes the project easier and faster! Second, your pillow will be one of a kind because it is made by you and upcycled from a unique jacket. And finally, sewing it from a coat means that one side of the pillow will be plain fabric and the otherside will have a neat button and pocket effect, which looks super cool and gives you some decorative options!
Materials:
- old coat (make sure that the material will be nice for a pillow),
- Pillow filling (for a fully upcycled project use an old pillow or scrap fabric)
- sewing supplies (sewing machine or needle, thread, and pins),
- scissors
Instructions:
 Take the time to find the right materials for this project. Make sure that the material of your coat will be comfortable as a pillow.
 Lay out your coat and decide where you want to cut it. I recommend cutting it out as large as possible at first, because you can always trim off extra afterwards but you can't replace the fabric once it's been cut.
- I recommend cutting the coat just below the armpits and trimming the hem off the very bottom.
- TIP: Use a ruler and felt marker or chalk to draw a straight line. My coat had lines in the pattern which I used instead.
 Open the rectangle of coat fabric you have and look at the inside. There my be some parts of the coat that have been folded over. I cut these parts off with a pair of scissors so that there were less layers of fabric passing through the machine.
- Every coat is different so you may have to get creative with how you work with the seams of the coat, but that is what makes this project so unique!
- Start sewing the pillow! I used a simple straight stitch for the whole project. Using a machine is the easiest way to sew the pillow but it is possible to hand sew instead (it will just take longer).
 Coats that go below the waist often flare out. You can leave as is for an easier or you can add a couple extra rows of stitches to make the coat more square/pillow-shaped.
- TIP: Turn the coat inside out and close it so it is in its pillow shape. Use a ruler and felt marker or chalk to draw a straight line and use pins to secure this in place. Then sew a straight stitch along the line to create a more pillow-like shape.
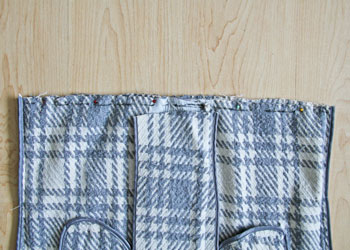 Keep the coat inside out while you sew up the bottom and top end to make a "closed" pillow. (It won't technically be closed because the coat opening with the buttons will remain open to insert the pillow).
 Sew a straight stitch along this line to close one end of the coat pillow. Repeat on the other side.
- TIP: It will be hard to sew over the middle opening of the coat (the hemmed parts with the buttons and holes) because there will be extra layers of fabric to sew together. You may have to go extra slow and steady along that part.
 Once both sides are sewn up a secured, turn the pillow case back to right-side out.
 Insert a pillow into the case through the button part of the old coat.
- I used an old pillow but you could also put some scrap fabric or pillow stuffing inside. If you choose to use scrap fabric or pillow stuffing, you may want to stitch up the center part of the old coat or create a small pillow with some basic fabric to hold the stuffing in place.
 Enjoy your comfy new pillow!
Print friendly version of these instructions