DLTK's Crafts for Kids
Rock Painting: Make a Ladybug Rock Craft


Crafting with kids is not only a great way to spend quality time together but also an opportunity to foster their creativity and imagination. In this craft tutorial, we'll learn how to transform a smooth rock into a cute ladybug.
This craft is perfect for kindergarten children and provides an exciting way to engage with nature by going on a rock-hunting adventure. Let's dive in and have some fun painting rocks!
Materials:
- Smooth rocks (collected during a nature walk)
- Acrylic paints (red, black, and white)
- Paintbrushes (one small and one medium-sized brush)
- Water cup and cloth for cleaning brushes
- Protective cover (newspaper or plastic tablecloth)
- Optional: Clear sealant (to protect the paint)
Instructions:
Step 1: Nature Walk and Rock Collection
- Take a nature walk with your child and encourage them to find smooth rocks suitable for painting. Look for rocks that are flat and oval-shaped, similar in size to the palm of their hand. Remind them to respect nature and only collect rocks from areas where it is permitted.
Step 2: Cleaning and Preparing the Rocks
- Once you have collected the rocks, bring them home and wash them with warm soapy water to remove any dirt or debris. Rinse them thoroughly and allow them to dry completely before painting.
Step 3: Base Coating the Rock
- Place the clean and dry rock on your protective cover. Using a medium-sized brush, paint the entire rock with red acrylic paint. Ensure that the paint is applied evenly and covers the entire surface. Let it dry completely.
Step 4: Adding the Ladybug Details
- Once the red base coat is dry, it's time to add the ladybug's distinctive black spots. Using a small brush and black acrylic paint, carefully paint dots on the red surface. Encourage your child to be creative with the placement and size of the spots. Let the black paint dry before proceeding.
Step 5: Creating the Face
- Now it's time to give the ladybug its adorable face. Dip the end of a small brush into white acrylic paint and carefully dot two small circles for the eyes. Allow the white paint to dry. Next, dip the tip of a small brush into black paint and carefully add small dots for the pupils. You can also paint a curved line for the smile. Let the black paint dry completely.
Step 6: Optional: Seal the Paint (Adult Assistance Required)
- If you plan to display the ladybug rock outdoors, consider applying a clear sealant to protect the paint from the elements. This step should be done by an adult in a well-ventilated area. Follow the instructions on the sealant product for application and drying time.
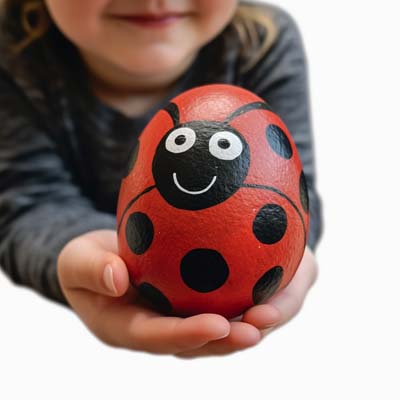
 << This is the first one Tasha ever made me! I still treasure it!
Congratulations! You've created a delightful ladybug rock craft. Crafting with kids not only brings joy and creativity but also offers valuable learning opportunities. Through this activity, children get to explore nature, develop fine motor skills, and express their imagination. Display the ladybug rock in your garden or use it as a paperweight on a desk. Crafting together is a memorable experience that strengthens the bond between parents and children. So, go ahead and continue enjoying the wonders of nature and crafting with your little ones!
Remember to have fun and let your creativity soar as you embark on more crafting adventures together.
Happy rock painting!
Leanne
Print friendly version of these instructions.