DLTK's Crafts for Kids
Enchanting DIY Pressed Flower Mobile for Kids to Make: Step-by-Step Guide
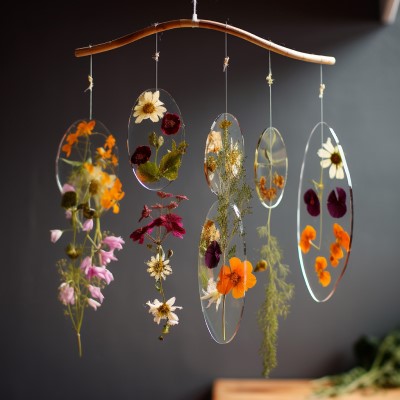
Hello, dear friends! Today, I'm going to share with you a step-by-step guide to creating a delightful DIY pressed flower mobile for kids to make. This charming craft project is perfect for little ones to get involved in and is a fun way to spend an afternoon together. Using a wooden hanger, pressed leaves and flowers, contact paper, and natural twine, you'll create a beautiful and eco-friendly decoration that will add a touch of nature to your home. So, let's get started on this wonderful adventure!
Materials:
- A wooden hanger, piece of dowel or branch
- Pressed leaves and flowers (you can either press them yourself or purchase them pre-pressed)
- Clear contact paper
- Natural twine
- Scissors
- A hole punch
Instructions:
- Prepare your pressed flowers and leaves
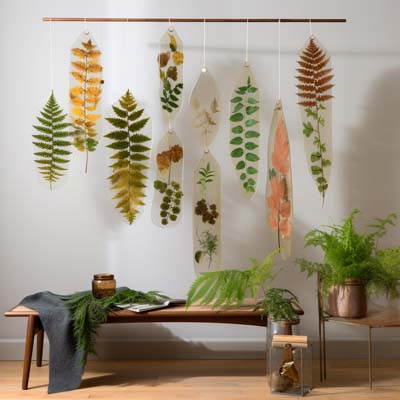 Before we begin, make sure your pressed flowers and leaves are ready to use. If you've pressed your own flowers, ensure they're completely dry and flat. To do this, place them between the pages of a heavy book, and leave them for at least two weeks to ensure they're properly pressed. You can use things like ferns too!
 -
Cut the contact paper
Now that your flowers and leaves are ready, it's time to cut the contact paper. You'll want to cut out two pieces of contact paper for each flower or leaf, making sure they're large enough to accommodate the whole piece with a small margin (at least ¼ inch) around the edges. This will make it easier to seal the flowers and leaves inside the contact paper. - Arrange and seal the flowers and leaves
Peel the backing off one piece of contact paper and carefully arrange your flowers and leaves on the sticky side. Once you're satisfied with the arrangement, peel the backing off the second piece of contact paper and gently press it on top of the first, sandwiching the flowers and leaves between the two layers. Smooth out any bubbles and ensure the edges are sealed properly. - Trim the edges
With a pair of scissors, carefully trim the excess contact paper around the flowers and leaves, leaving a small margin around the edges to keep them sealed. - Punch holes for hanging
Now, it's time to prepare your flowers and leaves for hanging. Use a hole punch to create a small hole at the top of each sealed piece. - Cut the twine
Next, cut several pieces of natural twine to your desired length. The length will depend on how long you want your mobile strands to hang. I recommend cutting varying lengths to create an interesting, cascading effect. - Attach the twine to the flowers and leaves
Thread one end of the twine through the hole in each pressed flower or leaf piece, then tie a secure knot to keep it in place. Repeat this process for all your flowers and leaves. - Attach the twine strands to the wooden hanger
Now it's time to attach your twine strands to the wooden hanger. Depending on the design of your hanger, you may need to tie them directly onto the hanger or loop them around a hook or notch. Space the strands evenly along the hanger, adjusting the lengths as needed to create a balanced and visually pleasing arrangement. - Optional: use hot glue to add a few sturdy dried flowers that aren't enclosed in contact paper to the piece of twine. Examples of sturdy dried flowers include strawflowers, baby's breath and statice. You can also use your hanger to hang little bundles of fresh herbs or flowers like lavender and chamomile to dry for tea making!
- Make final adjustments and hang your mobile
Once all your flowers and leaves are attached to the wooden hanger, take a moment to make any final adjustments to the arrangement. Then, find the perfect spot in your home to hang your new pressed flower mobile, sit back, and admire your handiwork!
And there you have it - a beautiful, eco-friendly pressed flower mobile to brighten up your living space. This DIY project is not only a delightful way to add a touch of nature to your home, but it's also a fantastic conversation starter and a great opportunity to showcase your creativity. You can personalize your mobile by choosing flowers and leaves in your favorite colors, or even by incorporating herbs or other elements that have special meaning to you.
As you become more comfortable with the process, feel free to experiment with different shapes and sizes of contact paper, or even try layering multiple flowers and leaves within a single piece for a more intricate design. You could also create themed mobiles to celebrate different seasons or holidays, or even make smaller versions to give as unique, handmade gifts to friends and family.
One of the best things about this project is that it's easily adaptable to suit your personal style and preferences. Whether you prefer a minimalist look with just a few carefully selected flowers or a lush, vibrant display with a wide variety of leaves and blooms, your pressed flower mobile is sure to be a stunning and distinctive addition to your home decor.
And remember, this is more than just a craft project - it's an opportunity to connect with nature, appreciate the beauty of the world around us, and express our creativity in a meaningful and sustainable way. So, the next time you're out for a walk or spending time in your garden, keep an eye out for beautiful leaves and flowers that would make perfect additions to your next mobile project.
I hope you've enjoyed this step-by-step guide to creating a pressed flower mobile, and that you're inspired to try your hand at this lovely and rewarding craft.
Thank you for joining me on this creative journey, and happy crafting!
Leanne
Print friendly version of these instructions.