DLTK's Crafts for Kids
Preserving Nature's Beauty: A DIY Pressed Flower Wall Art for Kids

Nature is an endless source of inspiration and wonder for children. Encouraging them to explore, appreciate, and preserve the beauty of their natural surroundings can help them develop a deep connection to the environment. One creative and engaging way to do this is by creating DIY pressed flower and leaf wall art. This project not only allows children to appreciate the vibrant colors and intricate patterns of flowers and leaves, but it also provides a lasting keepsake of nature's splendor.
In this tutorial, we will guide you through the process of creating a stunning pressed flower and leaf wall art piece using a floating frame with a clear back. We will discuss the joys of preserving nature for children and provide step-by-step instructions to create a masterpiece they will be proud of.
Materials:
- Fresh flowers and leaves (various sizes, shapes, and colors)
- Heavy books or a flower press
- Paper towels or blotting paper
- A floating frame with a clear back (size of your choice)
- Tweezers or small tongs
- Craft glue or clear drying adhesive
- Scissors (optional)
- A clean, flat workspace
Instructions:
 Collecting Flowers and Leaves: Begin by taking your child on a nature walk to collect a variety of flowers and leaves. Encourage them to choose different shapes, sizes, and colors, while also being mindful of the environment and not over-picking any one area. This is a great opportunity to discuss the importance of preserving nature and the role each plant plays in its ecosystem.
- Preparing Flowers and Leaves for Pressing: Once you have collected your flowers and leaves, remove any dirt or debris gently. If necessary, use scissors to trim the stems or remove unwanted parts. Arrange the flowers and leaves on paper towels or blotting paper, ensuring they do not overlap. Cover them with another layer of paper towels or blotting paper.
- Pressing Flowers and Leaves: Place the paper towels or blotting paper containing the flowers and leaves inside a heavy book or flower press. If using a book, stack additional books or heavy objects on top to create pressure. Make sure the weight is distributed evenly across the surface of the book. Leave the flowers and leaves to press for 2-4 weeks. Check them periodically to ensure they are drying evenly and to replace the paper towels or blotting paper if they become too damp.
- Designing the Wall Art: While waiting for the flowers and leaves to dry, work with your child to design the layout of the wall art. Sketch out the floating frame's size on a piece of paper and experiment with different arrangements of the flowers and leaves (you can use some unpressed flowers and lay them out in different designs -- just play a bit while you wait for your flowers to dry!). This is an opportunity to explore color theory, composition, and balance with your child.
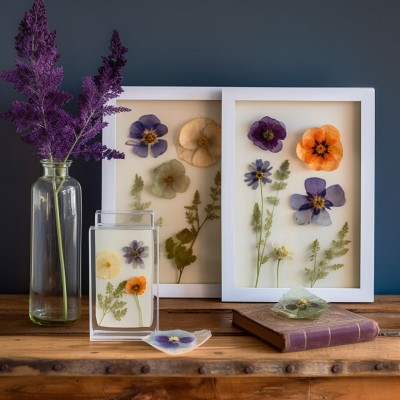
- Assembling the Wall Art: Once the flowers and leaves are fully dried and pressed, carefully remove them from the pressing materials. Lay the clear back of the floating frame on a clean, flat workspace. Using tweezers or small tongs, gently place the flowers and leaves onto the clear back according to your design. Once you are satisfied with the arrangement, use a small amount of craft glue or clear drying adhesive to secure each flower and leaf in place. Allow the glue to dry completely.
- Framing the Wall Art: Once the adhesive is dry, carefully place the front panel of the floating frame onto the back panel, sandwiching the flowers and leaves between the two clear panels. Secure the frame according to the manufacturer's instructions.
-
You can use a frame with a background instead of a floating frame (clear backed frame) if you prefer!
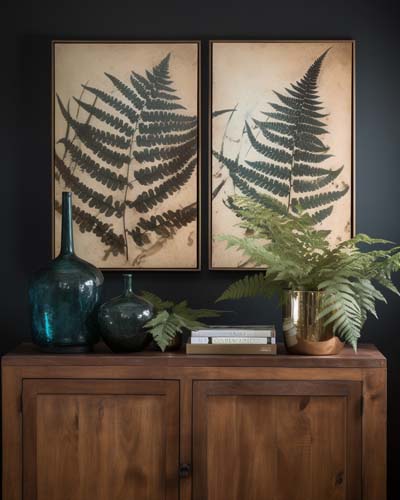
You can also press things other than flowers and frame them in the same way -- like leaves and ferns.
Conclusion:
Creating a DIY pressed flower wall art is a fantastic way to engage children in the joys of preserving nature. Through this hands-on activity, they will learn the value of patience and the importance of environmental stewardship while developing their artistic skills. The finished wall art serves as a beautiful reminder of the fleeting beauty of nature and a lasting keepsake of the time spent together exploring the outdoors.
This project is also an excellent opportunity to discuss the changing seasons, the life cycle of plants, and the importance of biodiversity. As children collect and press flowers and leaves throughout the year, they can observe how nature evolves and transforms.
The pressed flower and leaf wall art is a versatile project that can be adapted to various ages and skill levels. For younger children, focus on the process of collecting and pressing the flowers and leaves, while older children can delve deeper into design principles and even experiment with creating more complex arrangements.
The possibilities for this project are endless, as each piece of wall art will be unique, reflecting the individuality of the flowers and leaves chosen and the personal touches of the child who creates it. Encourage your child to continue exploring the world of nature-inspired art and crafts, as these activities can foster a lifelong appreciation for the environment and its incredible beauty.
Ultimately, this DIY pressed flower and leaf wall art project is a fun, educational, and meaningful way to inspire children to connect with nature and express their creativity. Display their masterpiece proudly in your home, knowing that it serves as a testament to the importance of preserving the natural world for generations to come.
Happy crafting!
Leanne
Print friendly version of these instructions.