 Decorated Perler Bead Binders
- Perler Beads with CIRCLE base:
- very inexpensive, but really neat beads you can pick up a lot of places (we got ours at Wallmart).
- If you already have the square base and don't want to buy another, you can create different characters to put on your binder.
- Iron (may require adult assistance).
- Plain binder in your preferred color
- Hot glue gun (adult assistance) or strong white glue (kids).
Instructions:
- Have the children carefully arrange the perler beads in their preferred shape -- we made small and large flowers for our binder
- Follow the directions on the perler beads (basically, you arrange the beads on the form, cover with a waxy paper that comes with the beads and iron for a couple of seconds.).
- Hot glue (adults) or white glue (kids) the decorations to the front of the binder.
Perler Bead Ideas for a Circle Base:
 Flower (Large)
(we used these on our binders and on our
bulletin board but you can also use them as necklaces):
You could also do this with white beads and call it a snowflake
 Flower (Small)
(we used these on our binders and on our
bulletin board but you can also use them as necklaces):
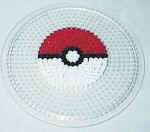 Pokeball:
(we used these for our Perler Keyrings)
center "small flower" of white
surround with one row of black
split whole thing with black
fill one half with red and the other with white
 Pot of Gold:
Make a circle with black beads (ours was the center with three more layers).
Take a few of the beads off the top of the circle and replace them with yellow ("gold")
Add a black bead on each side of the gold to make the edges of the pot.
Add five rows of rainbow colors to the top to complete.
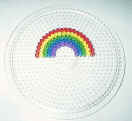 Rainbow:
(we used these for our Perler Keyrings)
leave center "small flower" blank + one more round blank
one row each of 5 or 6 rainbow colors
 Smiley Face
(pictured on Kaitlyn's Perler ecklace):
"small flower" of yellow in the center
put black eyes and smile under and over center
fill in with yellow
 Watermelon Piece
(pictured on Tasha's Perler Necklace):
two rows green,
black scattered around,
fill in with red
 Watermelon Slice: