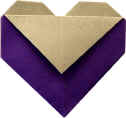
You can slip a note, candy cane, stick of gum or other thin object into these
cute little origami hearts and give them to a good friend. Although not
strictly allowed in origami, if you're inserting something heavy you might want
to use a bit of tape or glue to make sure your heart doesn't break (no pun
intended *grin*)
square of paper - click
here for instructions to make a rectangle of paper (typical 8.5x11
sheet) into a square.
NOTE: origami paper typically comes with each side a
different color -- this is perfect for this project!! You can
find double sided origami paper at your local craft store -- it is inexpensive.
Instructions:
Valley fold paper from corner to corner, making a triangle.
Valley fold the triangle from corner to corner, making a smaller
triangle.
Unfold everything -- you'll have a square of paper with an X
crease.
Valley fold the bottom edge up to the top.
Valley fold the left edge over to the right.
Unfold everything -- you'll have a square of paper with an astrix crease.
To make this a bit easier, flip your paper over and refold
everything so your folds crease both ways.
Valley fold paper from corner to corner, making a triangle.
(I know, we've done this before *grin*)
When you look at it from the front it looks like a diamond with a
crease in the center. The opening should be at the top of the
project.
Valley fold the top layer of paper down.
Flip over.
Valley fold the top layer of paper down.
Valley fold the two points at an angle so they form little
triangles who's edges match the edge of the previous fold
Valley fold the tips of the triangle down.
Valley fold the side points of the heart inward.
Optional: apply a bit of glue or tape to the last 4 folds
(the 2 tips and 2 points) -- strictly speaking, this isn't allowed
in origami, but it will make your project sturdy enough to slip
candy into your pocket.
Flip your heart over and pull open the little pocket in the front
if you would like to slip in a note, stick of gum or small candy!
 You can slip a note, candy cane, stick of gum or other thin object into these
cute little origami hearts and give them to a good friend. Although not
strictly allowed in origami, if you're inserting something heavy you might want
to use a bit of tape or glue to make sure your heart doesn't break (no pun
intended *grin*)
You can slip a note, candy cane, stick of gum or other thin object into these
cute little origami hearts and give them to a good friend. Although not
strictly allowed in origami, if you're inserting something heavy you might want
to use a bit of tape or glue to make sure your heart doesn't break (no pun
intended *grin*)