DLTK's Crafts for Kids
Origami Star
 Contributed by
Leanne Guenther
These stars are great projects for a number of themes -- Japan, Christmas, Fourth of July, etc. They are quite easy (for origami) and are suitable for age 7 and up.
Materials:
- Square piece of paper (you can use a piece of construction paper and just square it off... It's about the perfect size for children -- not too small and fiddly).
- If you want to use the pieces as decorations, you can even purchase the fancy origami paper from a craft store
 TERMINOLOGY -- MOUNTAIN FOLD:
fold the paper under -- see how it looks like a mountain?
 TERMINOLOGY -- VALLEY FOLD:
fold the paper to the front.
 Instructions:
- to make a square piece of paper, valley fold diagonally and cut off the excess
 valley fold the paper in half diagonally (so you have a
triangle) and then unfold the paper
 valley fold the paper in half diagonally the other way (so you have a
triangle) and then unfold the paper
 valley fold the paper in half (so you have a rectangle) and
then unfold the paper
 valley fold the paper in half the other way (so you have a
rectangle) and then unfold the paper
valley fold the paper in half the other way (so you have a
rectangle) and then unfold the paper- Wow! that's a lot of creases.


 OK... Now let's make the star.
- Refold the paper in half diagonally (valley fold) to make a triangle but this time leave it folded


 Valley fold the left side of the triangle so the edge falls on the
closest crease.
Valley fold the left side of the triangle so the edge falls on the
closest crease.- Mountain fold the right side of the triangle so the edge falls on the closest crease

![]()
 THE TOUGH STEP - OPTION 1
- Grab the tip of the FRONT of the triangle and mountain fold it towards the right side (let the creases you've made guide the fold).
- Grab the tip of the BACK of the triangle and valley fold it towards the left side (let the creases you've made guide the fold).
- Notice how A and B switch places

![]()
 THE TOUGH STEP - OPTION 2
- If you struggle with the above step, instead try grabbing A and B and switching their spots... A should go over the top and B should go underneath to arrive at their final positions


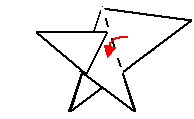
 Valley fold the left side down (there's a crease there, so it should
be easy)

 Valley fold the piece you just folded, back up again -- but not on
the original crease. Instead make a new crease and create a side
of the star -- it's sort of up to you where you want the star point to
be created.
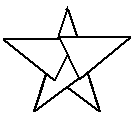
 Now we do the right side. Valley fold the right side down
(there's a crease there, so it should be easy)

 Valley fold the piece you just folded, back up again -- but not on
the original crease. Instead make a new crease and create the last side of the star.
 If you made nice firm creases throughout the entire project, the
star should hold itself together.
If you made nice firm creases throughout the entire project, the
star should hold itself together.- Strictly speaking, glue and tape aren't used in origami, but you might want to put a few dots of glue here and there to hold the star in place (especially if you're going to display it for awhile)
Print friendly version of these instructions