DLTK's Crafts for Kids
Dry Brushing Technique in Watercolor Painting
 Contributed by
Leanne Guenther
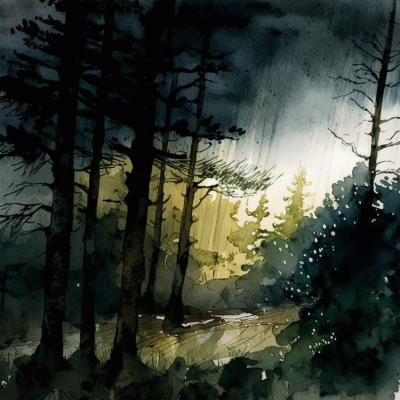
Dry brushing is a watercolor painting technique that uses minimal water and more pigment to create textured, rough effects. This method is perfect for adding details, texture, and depth to your paintings. I particularly like it for adding rain effects. Here's a step-by-step guide to help young artists master the dry brushing technique:
Materials:
- Watercolor paper (cold press, 140 lb or heavier)
- Watercolor paints (student grade is fine)
- Brushes (round and flat, preferably with stiffer bristles)
- Water container
- Paper towel or cloth
- Palette (or a white plate)
- Masking tape
- Board or sturdy surface
Instructions:
Step 1: Set up your workspace
Tape your watercolor paper to the board using masking tape to keep it secure and flat while you paint. Prepare your paints, brushes, water container, and palette nearby.
Step 2: Mix your colors
Choose the colors you'd like to use and mix them on your palette. For dry brushing, you'll want to create a thicker paint mixture with less water than usual.
Step 3: Load your brush
Dip your brush into the water and then gently tap it on the edge of the container to remove most of the water. Load your brush with the thicker paint mixture from your palette.
Step 4: Remove excess water and paint
Using a paper towel or cloth, gently dab your brush to remove any remaining excess water and paint. The bristles should be slightly damp but not wet.
Step 5: Apply the dry brush technique
Gently drag the brush across the dry surface of your watercolor paper. The bristles should skim the paper, leaving a textured, broken line of paint. Adjust the pressure and angle of your brush to create different effects.
The image to the right had dry brush techniquest done at a variety of angles. The light coloured (white) parts are done by scratching the wet paint gently with a fine instrument (I use the back of a paint brush).
Step 6: Experiment with brush strokes
Try different brush strokes, such as short, quick strokes for grass or longer, sweeping strokes for branches. You can also use the side of your brush for broader strokes or the tip for more precise details.
Step 7: Layer and combine techniques
Dry brushing works well with other watercolor techniques, such as wet-on-wet or wet-on-dry. Once your dry brushed layers are completely dry, you can add more layers or details using other techniques to create depth and dimension in your painting.
Step 8: Practice and have fun
Mastering the dry brushing technique takes time and practice. Experiment with different brushes, paint consistencies, and brush strokes to discover the effects you like best. Most importantly, have fun and enjoy the creative process!
By following these steps and incorporating the dry brushing technique into your watercolor painting practice, you can add texture, detail, and depth to your artwork. Keep experimenting and enjoy the artistic journey!
More:
Print friendly version of these instructions